
Finding simple book formatting for your nonfiction book can be tricky.
For one, if you’ve never formatted a book before, how do you even know what it should look like?
How should you space your paragraphs?
What about images?
And how do you make certain parts of your book stand out, like chapter headings, quotes, or bonus tips…?
Wanna know how I figured out how to format my own books?
Yes? Good.
Because that’s what I’m gonna share with you in today’s blog post.
Table of Contents
The tools
Before we get started, you should know that I use Scrivener to format my nonfiction books.
Scrivener is not only a great writing tool, but it also allows you to format and export books to every format you could need.
Want a PDF? Done.
Need a .mobi file for Kindle. Check.
Looking to distribute it to iBooks and Google Play?
You’ll need a .epub file for that. Done and done.
There are many options available for formatting your book, but Scrivener makes things simple, at least for me.
And I like simple.
In the tutorial videos below, I’m going to show you two ways you can format your nonfiction book (for print) using Scrivener.
Simple Book Formatting With Scrivener
In this tutorial video, I’m going to walk you through how to set up your nonfiction formatting: how to format a book inside Scrivener.
Now the reason that I use Scrivener is that one, it’s my go-to writing tool. I write everything inside it. But it’s also because it exports to pretty much every single format that you could need for getting your book out there, in terms of distribution.
But there’s a slight caveat — when it comes to Scrivener and the formatting side of things — it’s all about keeping things simple.
If you’re looking for amazing graphics coming off the page or if you need formatting that’s outside the norm, then you’ll need to go to something like InDesign or pay for a designer to do that for you.
But if you want to keep your nonfiction book simple and easy for people to consume, then Scrivener is definitely what I recommend.
Simple book formatting best practices
First things first, let’s talk about best practices.
You want to choose one or two fonts only. One for your headings and one for your book main contents.
You can change the way a book looks and feels with the fonts you choose.
Not sure how to pair fonts? This post by Canva.com should give you some inspiration.
That’s one of the great things about Scrivener is that you can choose different fonts to make things stand out.
Now, as I mentioned, I’m talking about the print version in these tutorials.
When it comes to your ebook versions, your fonts are chosen based on the device the user has and there are only three or four font options.
So any fonts you choose for your ebook version will always be converted based on those options.
If you keep in mind that you don’t have a lot of control over the font when it comes to the e-book side, you’ll see that simple is better.
But when it comes to the print version, you can choose whatever you like.
In the video below I’m gonna walk you through, from a print perspective, how you can use fonts and other functions within Scrivener to get simple book formatting for your nonfiction book.
I love print books, so whenever I publish a book I do both a print and an ebook because I always like to have my own books in my hands!
You’ll see from the video that I always switch between Helvetica and Cambria for the fonts, those are my two go-to fonts.
I tend to change fonts based on the topic of the book.
Again, if you’re not sure on the best font pairings, make sure you read the blog post on Canva.com, it gives you best fonts for specific niches, so you should be able to find one that suits your topic well.
Another way to make different parts of your print book stand out is to use tables.
I’ve done that with the quotes in this book inside the video. Put a table around your quote and voila, instant ‘pop’.
And I’ve used caps to make other words stand out too. You can use italics as well.
Simple book formatting is about getting familiar with how you can use different fonts and different font sizes and variations to make things work for you and your book’s niche.
Getting your book out of Scrivener
The cool thing about Scrivener is there are two ways that you can export your book in terms of how it’s going to look once printed.
#1: You can come into Scrivener and you can apply all your formatting from within your main document area or
#2: You can do that from within the compile formatting settings.
This is what makes Scrivener so powerful.
With this particular book (in the video) I have set up the main document formatting to be overwritten by the compile formatting settings.

I have chosen to do a couple of different levels to format the font and the body text.
All that you need to do is come into Scrivener and then choose Compile > Formatting (as shown in the image above).
Click on the different levels. If you need to format them, you will click on the font and this will pop open a table where you can choose a font from the list, change the size, and appearance etc.
As you click through all the different levels you’ll see where the formatting will be applied, as it will be highlighted in yellow in the Binder.
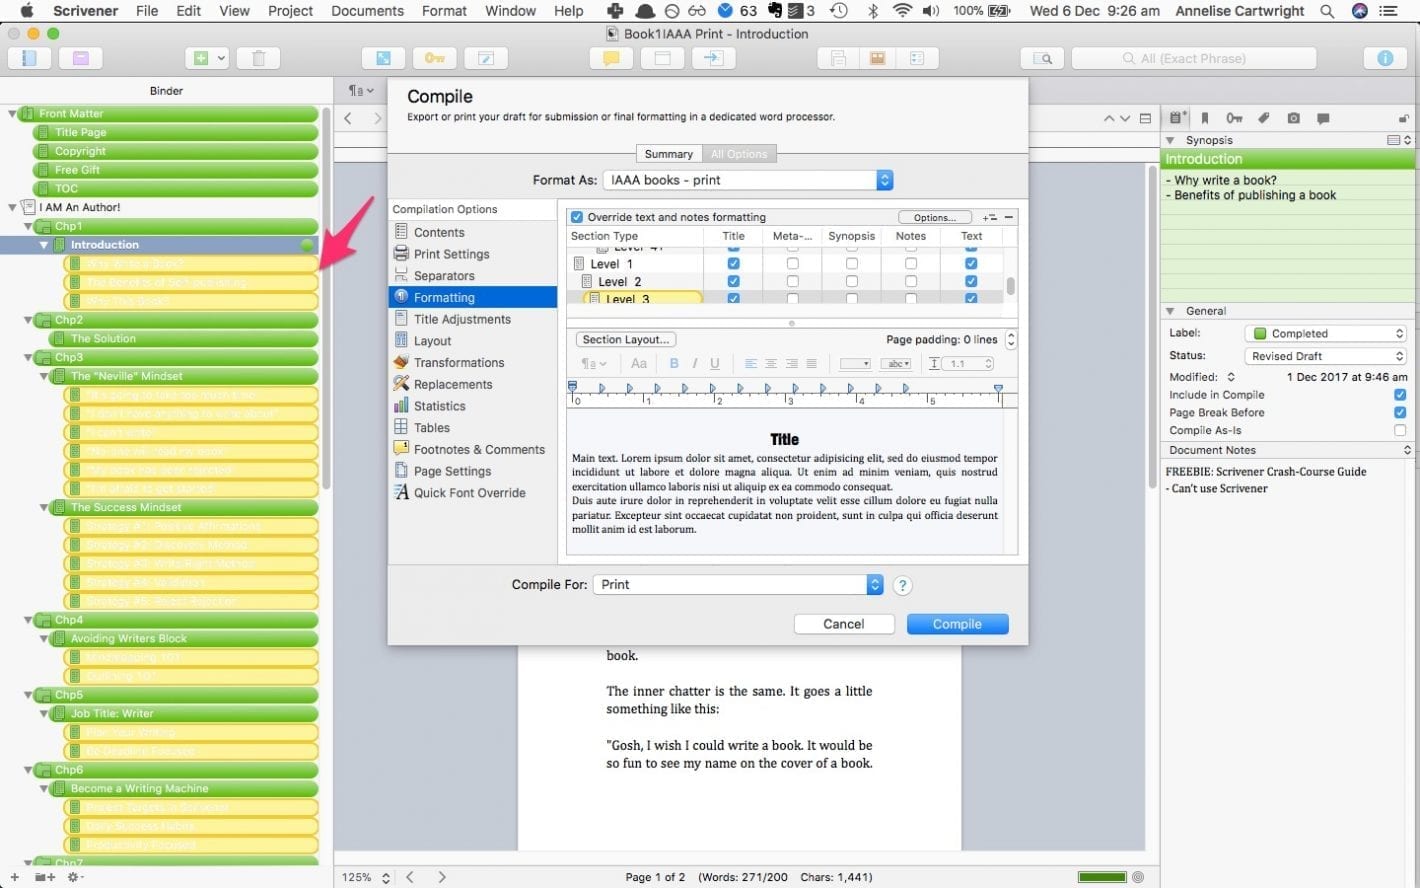
Make sure that you are including the title and the text of whatever’s in the document (shown by a tick within the formatting main screen).
Those two things are important, so make sure that those have been included because if they are not then they won’t “print” to your PDF, aka, your document will have no text!
Then whatever formatting you’ve got set inside the actual document — will be overridden by what you have set inside the compile formatting settings.
This is how compile formats EVERYTHING for you.
So simple.
There’s lots of different things that you can do to format your book using the Compile function. But I tend not to do more than what I’ve shown inside the video because I’m all about simplicity.
I want to keep things as simple as possible, make it easier for my readers to consume and understand the words inside my book.
Simple Book Formatting (Part 2)
This is part two of book formatting with Scrivener.
In the last video we talked about using the compile functionality to format your book — now in this video things are a little different — we are going to format using compile as-is, which you will see over on the right-hand side of your document when the Inspector is open.
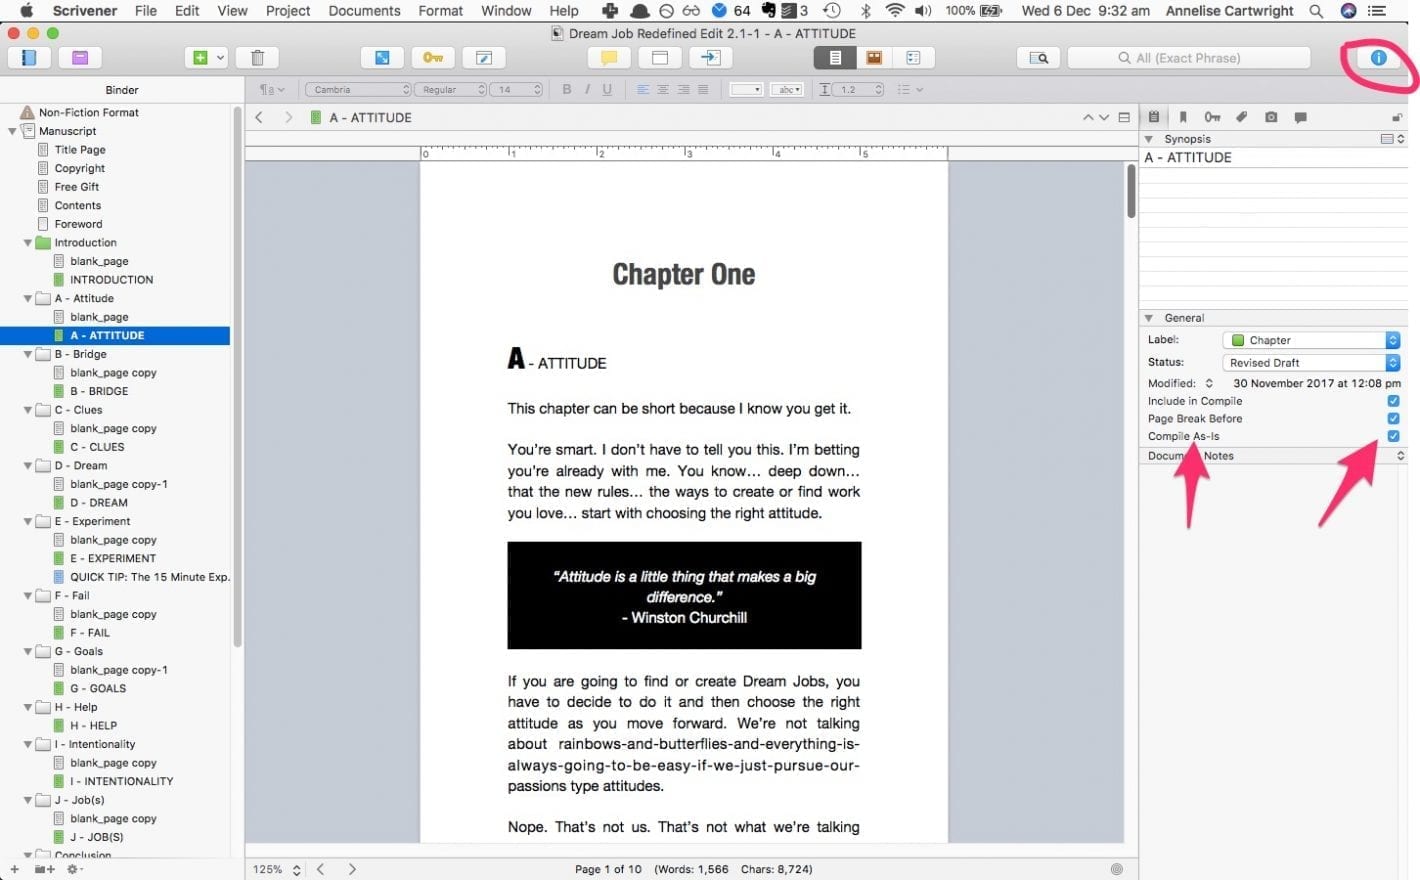
You tick this option if you want to keep the formatting as is.
What I mean by that is what you see is what you get.
Now the reason that you might want to choose to do this versus using the compile formatting functionality is if you have a lot of sub-subheadings.
For instance, in this particular book (featured in the video) — which is not mine it’s one of my clients — there are a lot of subheadings and sections.
Mitch Matthews is one of my amazing clients and he wanted to do this book a little differently.
I’ve been working on this book for him and it launches in January 2018 (it’s called DREAM JOB: Redefined), so if you’re reading this and it’s after January 2018, you’ll be able to grab it as it will be live on Amazon.
What we’ve done to format the book is chosen to use “compile as-is” because we wanted a bit more control over how the book formatting looked in the end.
Using the compile functionality and letting that override all the formatting wasn’t an option for this book.
The reason I did this is that there are a lot of quotes throughout the book and there are lots of variations in font sizes.
One of the drawbacks of the compile formatting function is that you can’t stipulate more than two font sizes within each level (document heading and then document content).
During compile, it’s going to override everything from within the document.
The only other way around this would be to have many documents underneath each chapter.
So every time you wanted a different heading you would start a new document…
Every time you wanted a different subheading you would start a new document…
It can make your document get quite big and while Scrivener can still handle that; I don’t know about you but my mind struggles with keeping it all straight, so I keep things simple.
More formatting options
Now in terms of forcing chapters to start on a new page and all those sorts of things, you can manage that by using a blank page.
To create this, click the plus sign to add a new page and you call it “blank page”. Then you need to make sure that you put this code <$blank_page> in the body of the blank page.
And that’s it.
You don’t need to worry about trying to insert hundreds of empty spaces, as this can result in some weird formatting once it converts to PDF.
Depending on how the book looks when you preview it in PDF mode, you can play around and adjust your blank pages so that you have chapters starting where you want them.
Compile as-is gives you a lot more control. But it’s time-consuming to set up if your book is large.
So you have a few decisions to make when it comes to formatting, and it will largely depend on how your mind likes to organize things.
So there you have it.
Two options when it comes to formatting your nonfiction book inside Scrivener with simple book formatting.
Grab the Template Now
Enter your deets below to access the Scrivener nonfiction template
6 replies to "Crazy Simple Book Formatting Template for Non-Fiction Authors"
Hello! Quick question that’s entirely off topic. Do
you know how to make your site mobile friendly?
My website looks weird when browsing from my iphone4. I’m trying to find
a theme or plugin that might be able to fix this issue.
If you have any recommendations, please share.
Thank you!
Hi there, yes I use WordPress + OptimizePress SmartTheme. It’s a premium theme and I’ve been using it for over 5 years. It’s fully customizable and fully mobile friendly 🙂
Your template is amazing. My question is — what does the front matter section exist for? Is this where I upload the book cover?
Hey Phillip. No, the book cover is always added separately if you’re publishing on a platfrom like Amazon. The front matter section is for what you include at the front of a book… title page, copyright, table of contents, anything else that you want to have before the first chapter begins.
H Lise,
Will Scrivener allow me to have endnotes at end of the book before References and Index?
Hi Graham, yes, you can format your files to include endnotes etc, just like you would in MS Word etc.