
How do I start building an email list when I’ve just started my side hustle? How do I get subscribers on my email list? And how do I get started with #allthethings?
Today, I want to talk about how you go about starting an email list and why you would even want to do that when you’re just starting out.
Table of Contents
Why Start an Email List?
Your email list is something that you own. That’s why you want to start building your email list as soon as you possibly can when you start your side hustle when you start your website when you start writing your book, etc. That’s when you want to start. Immediately!
I wish I had started my email list right when I got started in my side hustle, and you’ll hear most online entrepreneurs say exactly the same thing. So if you are just at the starting point, you’re in a really good position to be able to start your email list now.
But how? How do you start an email list? Well, it’s actually really simple. You just have to make a few decisions.
Step 1: Choose an email platform
The first thing you need to do is choose an email platform. Now you might be a little bit confused about this, and it can be confusing if you don’t know what you’re looking for.
An email platform is simply a platform that is going to host your email subscribers’ information and allows you to create opt-in forms and landing pages to share with your email subscribers, or potential subscribers, so that they can join your email list easily. This is often a platform—or a software program—that is completely separate from your website.
You should never host your email addresses or your email subscribers on your website. Platforms like WordPress allow you to collect subscribers right from within WordPress, and they are stored in your WordPress backend. However, it is super hard to try and email them all in one go. And you can’t segment or tag those subscribers into categories they are interested in. You can’t really manage those email addresses appropriately within WordPress.
Recommended Platforms
Two platforms I’m going to recommend are either MailChimp, which is free for your first 2,000 subscribers, or ConvertKit, which is a paid service right from the start.
MailChimp is probably your best option if you are just getting started and you don’t have any additional money to invest in your side hustle right now. If you have a budget and you don’t want to have to start paying for anything when you’re not necessarily earning an income straight away, you’re best to go with MailChimp.
If, however, you want to make sure that things are set up optimally from the start and you don’t want to have to worry about going back and making changes, then I would recommend ConvertKit.
ConvertKit is what I use and it makes setting up your email opt-ins and landing pages so simple. I have done an entire ConvertKit walkthrough which you can check out here. ConvertKit is my preference. It has a lot of functionality that will see you through for a long, long time.
However, I understand that it’s a paid option right from the start so if money or a budget is something that you are looking to stick to, then make sure you go with MailChimp. It will serve you for a very long time. I started with MailChimp and used it for a good three years before I switched to ConvertKit.
You can also convert from MailChimp to ConvertKit later on. It’s a little difficult to do depending on how many opt-in’s you have created, but doable, so keep that in the back of your mind for when your side hustle takes off and your list becomes bigger than 2,000. It can be done, it just might take you longer than you might expect (I know it did for me).
Step 2: Create a Welcome Sequence
A welcome sequence is what you will use to welcome your new subscribers to your email list. To do this well, you’ll need to make sure you clearly tell your new subscribers what they can expect from you.
Let them see your personality, give them more free things and then surprise and delight them even more.
If you want more details, I’ve written about creating a welcome sequence your audience will love before. It’s all about warmly greeting new subscribers and automating the entire process.
Don’t skip this step, it’s important!
Step 3: Create Your First Opt-in Page
Both MailChimp and ConvertKit have built-in landing pages for you to use.
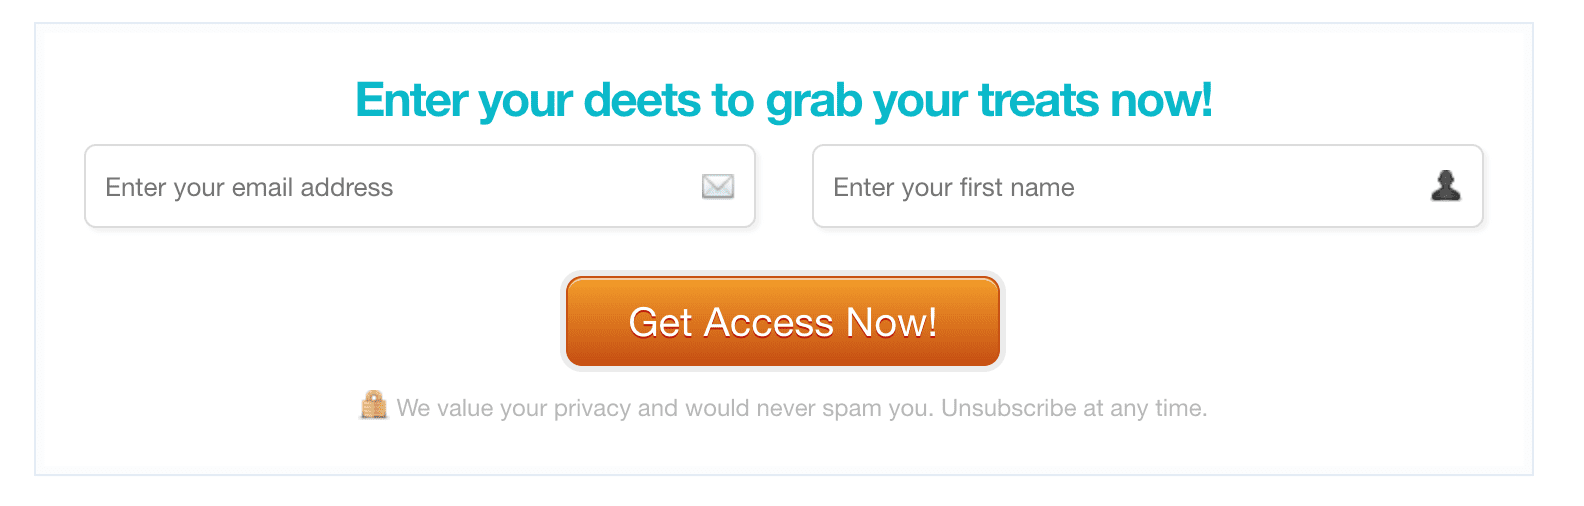
But first, you need to create an opt-in form. An opt-in form is simply the form where your new subscriber can enter their email address and their name (always optional).
A landing page is where you can add a headline, description text and an image depicting the lead magnet you’re giving away.
A landing page needs an opt-in form added to it for it to collect email addresses, whereas an opt-in form can exist on its own.
Here’s an example of an opt-in form on Hustle & Grove.
Here’s an example of a landing page on Hustle & Groove.

The whole purpose of a landing page is to do one thing — get your new subscriber to click a button to enter their email address.
Your landing page will have no other options on it. The potential subscriber either clicks the button and enters their email address or they close the landing page. That’s it. No navigation allowed.
Step 4: Choose Your Opt-ins and Lead Magnets
The next part is figuring out how to get people to actually join your email list. Generally, that is through some type of lead magnet or free gift or opt-in gift, whatever you want to call it. That is how you get people to join your email list.
You have to think about someone’s email as currency, as far as an online platform is concerned. That is the thing that they give out in exchange for something of value.
Your subscribers are pretty savvy. They don’t just hand over their email address for nothing. So you have to incentivize your subscribers to join your list.
I have a really great tutorial on how to identify your lead magnet and how to create one. Start with one and create more from there.
Step 5: Connect to Your Website
Once you’ve created all of the above, you need to connect your opt-in form or landing page to your website.
If you created a landing page on your website using your theme, then you need to add the opt-in form to your landing page.
Regardless of what you do, you need to capture the URL of your landing page and add it to your blog posts, social media, footer, even a notification bar on your website.
Anywhere that you’re sending people to your website, you’ll want to promote your landing page.
Now if you’re using something like MailChimp or ConvertKit, they have landing pages built in. So you can get away with just using their hosted landing pages versus adding them to your website. But you’ll still need that URL to promote it on your site.
At some point, you’ll want them all hosted on your website. You want to have everybody coming to one central place. So I would recommend doing that versus using the ones that are included with MailChimp and ConvertKit, if you can.
Remember, this is your business, so you do what works best for you right now. If the tech side of things scares you, then stick with the landing pages you can create with MailChimp or ConvertKit.
Keep it simple.
Step 6: Start Promoting
And then, once you’ve got that connected to your website, you need to promote your lead magnet. You need to get people to join your email list!
The best way to do that is to figure out where your target reader is hanging out.
For example, if they’re on Pinterest, create five to ten pins for your landing page. Pin those everywhere. Pin it into some group boards, your personal boards, whatever makes the most sense for you. You could even run some Pinterest ads as well.
If your audience is hanging out on Facebook, join some Facebook groups where they might be, as well as blogging groups, as these are great for sharing your lead magnets on too. Post on the days that you’re allowed to post your stuff and link it to your lead magnet. It’s all about sharing, sharing, sharing.
You need to be intentionally marketing or sharing that lead magnet so that people can join your email list, otherwise… crickets.
And, if you want to take it further, you could collaborate, do some guest posts, or be on a podcast and send people back to those landing pages as well.
Action Steps
Your immediate action steps are:
- identifying an email platform,
- figuring out your first lead magnet,
- creating your landing page and adding it to your website
- and then figure out where your target reader is and promote your lead magnet everywhere.
Let me know what your lead magnet it is below! I’d love to check it out.