Have you ever wondered how to write a book using your blog? I know it’s something I get asked a lot, but it’s more framed around “how do I write a book?”
What most blog owners don’t realise is that their blog can be turned into a book in a few simple steps. And that once this is done, you have a living, breathing product that you can promote forever.
Before we dive into how to write a book using your blog, let’s talk about why you might want to do this.
#1: Positioning – Position yourself as the expert in your niche!
#2: List Building – Grow your list of potential customers or clients
#3: Passive Income – Diversify your income base with passive income from a book
Now that you know why it’s a great idea to write a book, let’s dive into how that’s going to look for you using your blog.
Table of Contents
The Write a Book Roadmap for Bloggers
 Before you dive into writing your book, you need to have a plan of attack, aka a roadmap. Just like you plan out your blog content and social media marketing, you need to also plan out your book.
Follow the steps below to write your book:
#1: Review your top blog posts
Does your blog have a recurring theme or niche? If it’s focused on the one subject, then this part of the process is easy.
All you need to do is review your top blog posts using Google Analytics. Then view top shares on social media (you can find this information via your social media scheduler, like Buffer or CoSchedule).
Note down your top 20-30 blog posts.
Have a lifestyle blog where you write about multiple topics?
Still review your top blog posts as outlined above, but now you’re looking to see if any one topic is getting more ‘love’ than others.
Note down those blog posts.
#2: Mindmap your book idea
Now that you’ve got your most popular blog posts, you should have a good idea of what your book idea is going to be.
To flesh this out further, I find mind mapping to be a great exercise to do this.
Grab your fav colored pens and a large piece of paper and set a time for 15-30 minutes.
Write the main topic of your book in the middle (using one of your top blog posts as a starting point).
Then write down as many thoughts and ideas that come to your mind in relation to your book topic.
Jot these all down on your paper until the timer dings.
WARNING: Don’t overthink this. Just free write. If you stop yourself during this process to think if something belongs on your mind map, you’ll stop your creative brain from expressing itself. Don’t do that! Just write what comes to mind.
If you find yourself struggling to come up with ideas, play some of your fav songs to help get you in a creative mood, then reset your timer and try again.
You can do this for as many of your top blog posts as you like until you’ve got a feel for the book that you want to focus on.
As they say when you’re looking for someone special… “You’ll know when it’s the right one!”
#3: Outline your book
Once you’ve completed the mind mapping process and chosen your book topic, it’s time to figure out your outline.
Don’t think in chapters at this point, instead think of guiding your reader from start to finish. How are they getting from point A to point B What are all the bits in the middle?
Write this all down. I find using pen and paper still works best at this point, because you can number and highlight as you go.
Use your mind map to help if you’re a little stuck. You should be able to see ideas jumping out at you there.
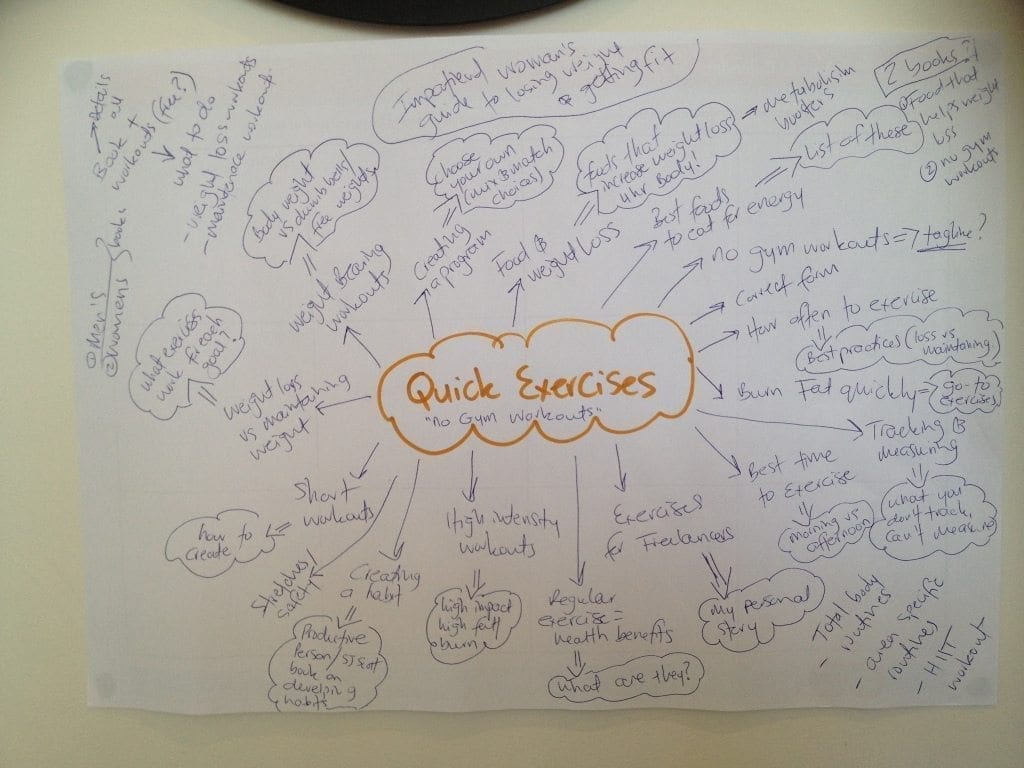
Below is a mind map from my first book, No Gym Needed. I later grouped similar ideas together and wrote my outline from there.

#4: Decide where you’ll write your book
We’re at the pointy end now. It’s time to get real and start writing. But before you do that, you need to decide which program you’ll use to do this.
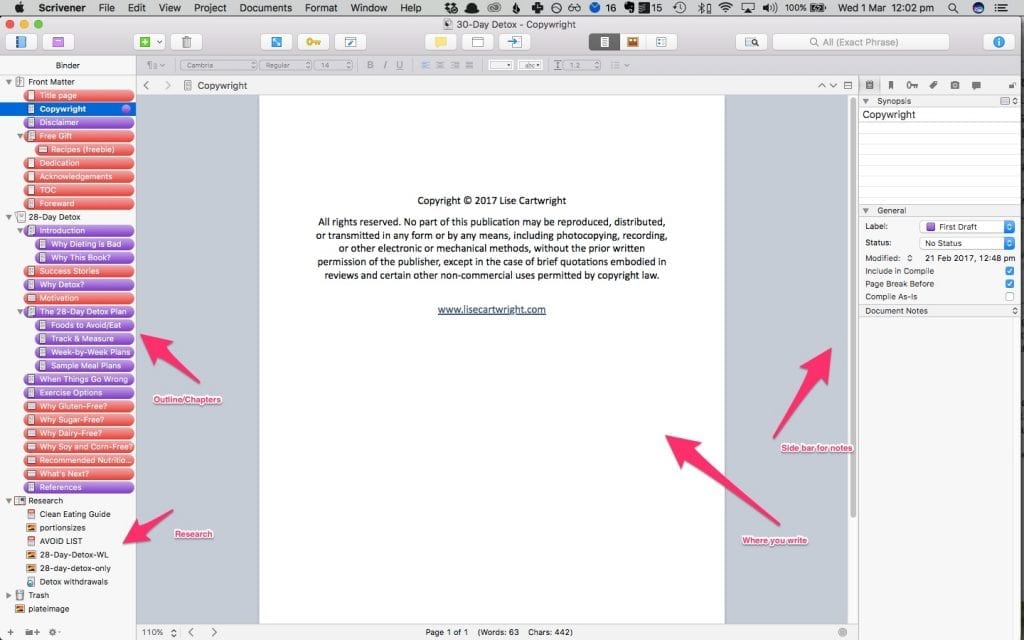
I’m a HUGE fan of Scrivener. It allows me to move whole chapters around, keep all my research in the one place and make notes in the side bar as I go.
Now, Scrivener isn’t for everyone. Full disclosure, it’s a bit of a learning curve to begin with because it doesn’t work the same way as other word processing programs do. But it’s worth it in the end, as far as I’m concerned.
Here’s a screenshot of what it looks like to work inside Scrivener:
Want to see how to use Scrivener? Click below to access the video now!
[button_6 bg=”orange” text=”style5_getaccessnow.png” align=”center” href=”https://hustleandgroove.com/thanks-and-share” new_window=”Y”/]
The next best option would be Google Docs, then Evernote, then MS Word.
MS Word should be your last resort if you want to stay sane that is! Have you ever been working inside a large MS Word document only to find it freeze mid-way through saving your work, then kick you out?
This has happened to me so many times and I’ve lost work in the process, that I just can’t use it anymore. Plus, you can’t drag and drop your chapters like you can inside Scrivener!
#5: It’s time to write a book
Once you’ve got your writing program sorted, it’s time to transfer your outline into your writing program, gather all your research, and start writing.
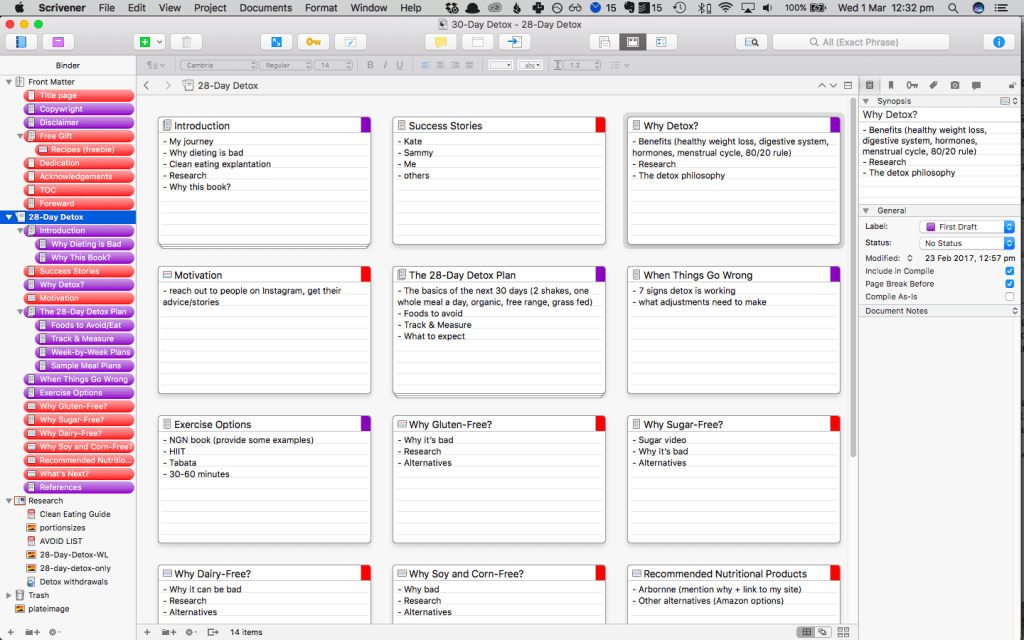
What helps me most is if I have my outline and then under each ‘chapter’ I make a few bullet points or a summary of what I want to cover at this point.
Here’s an example of what that looks like:
Then, when I sit down to write that ‘chapter’ I’m not having to ferret around for ideas because I already have a starting point.
When gathering your research, make sure you include all your blog posts that are relevant to each ‘chapter’. The aim is to not have you to do a ton of writing, more compiling and adding where necessary.
For example, when I wrote my best selling book, Side Hustle Blueprint, I did a search in my blog posts for the topics I was covering. I then copied those blog posts into the outline of my book and edited and removed content as needed.
It also allowed me to see where I had holes in my content, allowing me to add more depth via the book.
Publishing and Launching Your Book
As you get to the end of writing your book, you’ll be wondering what’s next.
This is when you should be reaching out to an editor (and yes, you absolutely need one, don’t fight me on this!). You should also be engaging a cover designer, and deciding on your launch plan.
There is a lot involved with publishing and launching your book, that you’ll want to make note of the following:
#1: Pre-Launch Phase
This is when you get your book edited, get a cover designed and decide what freebie you’ll be giving away to get new subscribers on your email list.
Your Freebie
Depending on the type of book you’ve written, your freebie might be a workbook that your readers can use to make notes as they work their way through your book.
It might be an action guide that provides all the resources and downloads you mention in the book.
It could be a recipe book, a template, a checklist or even an audio version of the book.
Whatever you decided, the same rules apply as they do to any lead magnet: it must be of value to your end reader.
Opt-In Page
Don’t forget, if you’ve got a freebie you need an opt-in page to capture all those email addresses!
Create this before you publish your book so that you have a link to include inside your book.
Keep it simple and ask the reader to do only one thing. Don’t link to your blog or other pages, keep it clean and just the opt-in.
Street Team
If this is the first time you’re launching a book, you might not be familiar with this term.
Your “Street Team” are your biggest fans. They are willing to read and review your book, share it during the launch phase and be your biggest supporter.
In exchange, you’ll give them early access to your book plus other cool things, like mentions inside your book, sharing their stuff on social media and with your own email list. Maybe even allowing them to write for your blog.
These people will have your back. Start building this list now. You’ll also want to give them an ARC (advanced reader copy) of your book at least 2 weeks before your launch date, so keep this in mind as you build your team.
Make sure they are able to help you when you ask them to do something. These people need to be engaged with you and your blog.
Reviews
Before you launch your book, you’ll need to have at least 8-10 reviews on the Kindle version.
Your street team should be able to do this for you.
They will need to buy your book to leave a verified review, which is what you want because Amazon gives more weight to these types of reviews.
The aim is to get honest reviews, not specify the type of review they leave, ie, you can’t ask them to leave you a 5-star review. You can only ask them to leave an honest review, whatever that may be.
I’ve found what works best is pricing my book at $0.99 initially, sending e-gift cards to my street team so they can buy the book, then raising the price to $4.99 just prior (at least 48 hours) to the launch date.
#2: Launch Phase
You have two options when it comes to a launch: a Free Launch or a Paid Launch.
I’ll outline these for you below.
Free Launch
(best suited to first-time authors or authors will small email lists – less than 3,000 subscribers)
This is when you offer your book for free for the first 1-5 days of your 7-day launch. Generally, 3 days should be enough.
A sample launch might look like this:
- Day 1: Biggest burst of promotions on this day, including emailing your list
- Day 2-3: At least one large promotion each day and 2-3 small promotions each day
- Day 4-7: Change book to $0.99 and share on social media
Paid Launch
(best suited to existing authors or authors with large lists – more than 3,000 subscribers)
This type of launch is when you offer your book for $0.99 for the duration of your 7-day launch.
A sample launch might look like this:
- Day 1-5: Small blogs and/or FB ads
- Day 6: Email your list and large promotional sites (all on this one day)
#3: Post-Launch Phase
Once your launch is over, you’ve got 30 days to ride the “Hot New Releases” list, after which time it will fall into a lower ranked book.
You’ll want to start monitoring your book from this point forward.
After the initial launch, your book will fall into a ‘safety’ rank, where it should hold that position quite well if you’ve gotten your content right, cover and the other areas that go into keeping a book ranking well.
If you start to see your books Amazon rank fall, then it’s time to do another promotion; a relaunch.
This time, go with a paid launch and follow the launch plan outlined above.
In most instances, this will be around the 90-day mark. You’ll also want to check your keywords, description and cover are also still working for you. If not, then you might need to tweak these too.
Next Steps
Writing a book using your blog isn’t the hard part, what comes afterward is. A lot of first-time authors get stuck on the process following the writing of their book, because there are a lot of moving pieces. It can be VERY overwhelming.


2 replies to "How to Write a Book Using Your Blog Posts"
Nice post! Very informative. I never thought of that, but when you’re an expert on a topic, it makes complete sense. I’m a huge Scrivener fan as well. 😉
Thanks for your supportive comment LM 🙂 It definitely makes sense when you’re a relative expert to do this, it’s another string to the bow, as it were 🙂