
When I first got started with ConvertKit, one of the things I loved the most was the power of their email automation rules. It was also the area that tripped me up the most, to the point where I now have pages and pages of email automation rules, making it extremely difficult to make any sense of what I’ve set up?♀.
I’m thankful for their visual email automations builder, which is rolling out as we speak. This is going to make my life one hell of a lot easier.
But the reality is, it’s not ConvertKit’s fault that I’ve landed myself in this email automation hell… I did this to myself because I
- Didn’t take the time to understand email automation rules
- Didn’t plan properly
I want to help you avoid doing the same thing. No matter what email platform you’re using, or what email automation tool you have access to, the email automation rules I’m going to talk about in this blog post, should be doable across any platform.
And hey, if they aren’t, then why not check out ConvertKit for yourself?! <– yes this is a shameless plug and my affiliate link. This means, if you decide to join ConvertKit through my link, I’ll get paid for it. It doesn’t mean it costs you anymore (because it doesn’t) it just means that I get rewarded for recommending a product I ADORE. If you’re not comfortable with this, just head on over to www.convertkit.com and sign up there, no harm, no foul.
Before we jump into the email automation rules, let’s make sure that you don’t make the same two mistakes I mentioned above.
Table of Contents
What Are Email Automation Rules?
Simply put, an email automation rule is based on a trigger and then an action. You can create as many automation rules as you need to.
What you don’t want to do is make automation rules willy nilly like I did otherwise, you could end up with something that looks like this (did I say again how thankful I am for the new visual automation builder launching soon?!)
As you can see from my scrolling nightmare above, I have email automation rules for automation rules… go figure.
So how do you avoid making this mistake? By planning out your email funnels!
Planning Email Funnels
If you truly want to avoid email automation hell, then you’ll take the time to plan out your email funnels. Then, you’ll be able to easily create email automation rules that support your business, rather than causing heart palpitations every time you try to remember what rule you set up and when.
The easiest way I know to plan email funnels is to take pen to paper. Draw out your email funnels. Here’s what that looks like for the Hustle & Groove Vault:
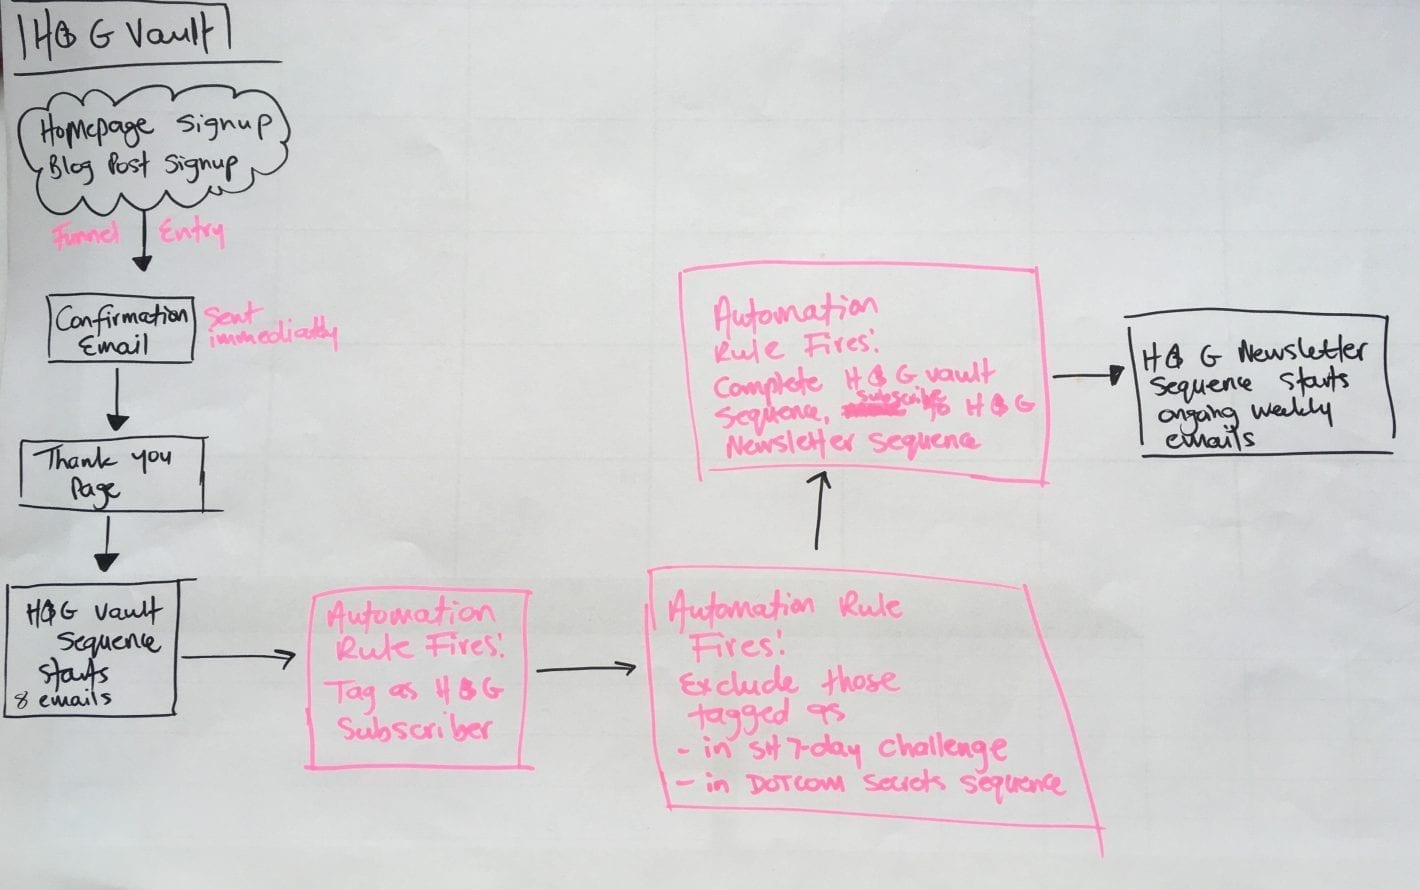
I know that’s a little messy, but it helps to see it visually for me. Now I get even more detailed and map out all the emails as well.
I’d recommend that you do this for all your assets, ie, lead magnets, webinars etc that act as an entry point into your email sequences.
Make sure you take a picture of the images you draw out and save them to something like Evernote, where you can refer back to them later and then recycle the paper.
Now that you’ve avoided making the same mistakes as me, it’s time to move on and set up my most powerful email automation rules!
 3 Email Automation Rules

Get started with setting up this powerful automation rules and rock your business like the boss that you are!
Email Automation #1: Segment Subscribers
This is my fav email automation rule. Without implementing it, you will see your open and click-through rates begin to fall the larger your email list gets.
Why?
Because your subscribers are not all the same! They want to connect and hear from you with targeted information that matters to THEM.
So that weekly email you’re sending out to EVERYONE on your list, how’s that working for you? Getting a lot of unsubscribes and next to nada clicks? It’s because you’re not segmenting.
ConvertKit makes this super, super simple by creating click link triggers.
Here’s how to set it up:
Step 1: Decide on where you’ll send your subscribers when they click the link trigger in your email.
This could be as simple as sending them to a relevant blog post, or sending them to a video or thank you page with your best blog posts/assets on that segment. Obviously, you need to have a couple of areas of focus for your business for this to work, so make sure you’re across those now.
For Hustle & Groove, I have three clear areas of focus:
- Self-publishing/author topics
- Email marketing topics
- Productivity topics
So when I segment my list inside my welcome email sequence, I’m going to send my readers to my top blog post on that topic. Alternatively, you could set up a resource page.
For example, with my side hustle segment, I have three pages set up. These pages are large resource pages that help people at different stages of side hustling… just starting, running a side hustle, and transitioning it into their full-time gig. You can see what that looks like by clicking here.
Either way, you need to be clear on your link clicks BEFORE you try to set up this email automation rule, otherwise, it won’t work.
Step 2: Create the automation rules
This might seem tricky, but once you understand how email automation rules work, it becomes extremely easy to setup.
Start by clicking “automations” inside ConvertKit (find these inside your own email service provider)
Click “add rule”
You’ll see a screen that looks like this:

Under the Trigger section, find the trigger that says “Clicks a link”. Click on this. You’ll see a screen appear that asks you to name your link click and to enter your link. This link is where your subscriber will go when they click on the hyperlink inside your email (shown in the next step).
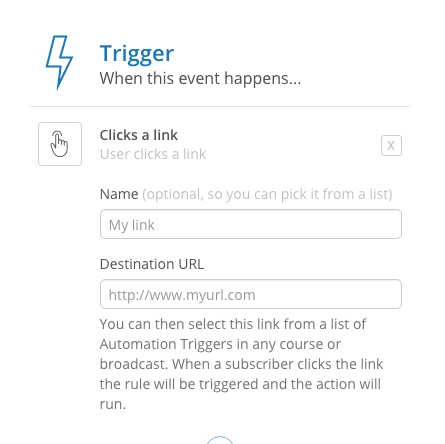
I like to name my triggers something meaningful, so I can easily find them when I’m adding triggers in my emails. Keep it uniform. So for me, my trigger naming structure looks like this:
- Blog Post: Blog post name
- Segment: Segment name
- Promotion: Promo name
- Landing Page: Page name
This will make your life a lot easier if you do this from the start.
Now enter the URL of the link you’re sending your subscriber too.
Now in the Action section, choose what you want to happen. It should be to add a tag, because we are segmenting our list.
Choose a tag from the dropdown list, or click the plus sign and create a new tag.
Again, you’ll want to have a uniform naming structure for your tags. Mine looks like this:
- INTEREST: name
- SEGMENT: name
- NO INTEREST: name
- STATUS: name
- PURCHASE: product/service
- LM: lead magnet name
- CLICK: link clicked
Feel free to use these for yourself. Just make sure you know what they mean and keep track of them using a spreadsheet.
Once you’ve set up the trigger and chosen an action, you can now click “save rule”.
But we’re not quite finished…
Step 3: Add hyperlink triggers inside email
Now that the link click trigger is set up, you can go and add it to your email sequence.
Early on in the H&G Vault sequence, I ask subscribers “Where are you on your journey?” Aim to do this within the first three emails of your sequence, so that you can set up other automation rules (which I’ll talk about soon!).
Here’s how you set this up:
Choose the email you want to add the link triggers too. Here’s what it looks like currently inside the H&G Vault sequence:
[images style=”2″ image=”http%3A%2F%2Fhustleandgroove.com%2Fwp-content%2Fuploads%2F2017%2F08%2FScreenshot-2017-08-17-10.19.57.png” width=”606″ align=”center” top_margin=”0″ alt_text=”Example%20of%20link%20trigger%20email%20automation%20rule” full_width=”Y”]
You can see that there are three hyperlinks in this email. Each one is a link trigger that segments my list by tagging each person as they click one of those links.
The easiest way to do this is to type out your email first, then go back and add the hyperlinks.
Highlight the text you want to hyperlink, then from the editing menu, click on the link icon. It’s right beside the paperclip.

You should see a screen that looks similar to this:
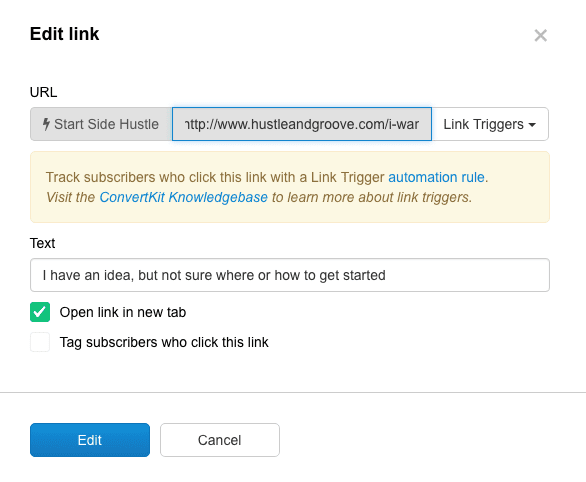
I’ve already got my link trigger setup, but to add one, you just click on the “Link Triggers” drop-down box and find the link trigger your want to apply to your text.
Once you’ve done that, your link will look like the image above.
Rinse and repeat for the other hyperlinks you want to add.
And that my friend, is how you set up the segmentation email automation rule.
Email Automation #2: Don’t Overwhelm Your List
This little rule is a godsend. And one email automation rule you NEED to implement the more sequences you create.
When you’re just starting out, it’s easy to sit and think “I don’t need to worry about setting up email automation rules, my list is small” and then, overnight, you run a giveaway or get featured on a large blog and then BOOM! Your list explodes and your subscribers are getting hundreds of emails from you on the daily…
Ok, that’s an exaggeration, but you know what I’m talking about.
If you’re like me, when you find someone whose content you LOVE, you sign up for all the things. You find ALL their lead magnets and you grab them. You cannot WAIT to start consuming all their tips and strategies.
But then, you start to get 2-3 emails a day from them. Yes, they are about different topics, but you’re like “oh man, I haven’t got time for this.” So you end up deleting or filing them in a ‘read later’ folder that you NEVER come back to.
This is something that I’ve done with my own email list too. It’s something we forget to do because there isn’t exactly a guide or manual that comes with your email service provider that says “READ THIS BEFORE YOU START SENDING EMAILS”.
Nope, there is nothing like that, if there was, then all our email platforms would be set up perfectly. But instead, we jump feet first and tweak as we go.
Such is the life of a budding entrepreneur.
Ok, so I know you’re now convinced that you need this email automation rule, but how do you set it up? And what is it?
Basically, it’s a rule that tells your email platform to only send one sequence to your subscriber at a time.
Now, to do this, you need to have a deep understanding of your email assets. If you haven’t drawn out all your funnels, now’s the time do get busy and do this.
Here’s how I did this for Hustle & Groove:
[bullet_block large_icon=”14.png” width=”” alignment=”center”]
- I reviewed my lead magnets and figured out which was the one that people signed up for the most (H&G Vault was the winner!)
- Next, I worked out all the sequences I had set up and decided which sequence I wanted to take precedence, ie, if someone joined the H&G Vault and grabbed the Book Funnel Cheat sheet, they would receive the H&G Vault sequence first
- From there, I worked out the priority of all the sequences based on the lead magnet they were attached to
- Any course sequences I had in place, trumped ALL other sequences. If someone has paid for a course, they should get that sequence pronto!
[/bullet_block]
Once you’ve got an idea of your own priorities, you now need to create a tag for each sequence that basically says “In sequence xxx”. With xxx being the name of your sequence.
Step 1: Tag your subscribers
Go ahead and do that for all your sequences. How?
By creating an email automation rule based on the trigger “Subscribes to a sequence” and adding an action “Add tag”. Name your tag as above.
Ok, so that’s the first part of this rule setup. Now the trickier part is going to take a little more thought. Actually, I’m going to keep it simple, if this doesn’t work for you, then yours is as complicated as mine — shoot me an email and I’ll break it down for ya!
Step 2: Open your main priority sequence
Using Hustle & Groove as the example again here, I open the H&G Vault Sequence. The next thing I’m going to do is click on the “settings” tab and scroll down till I see the “Exclude subscribers from this sequence” like below:
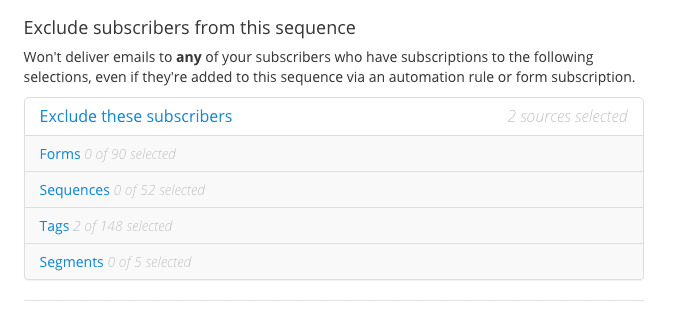
Step 3: Add your tags
Now, depending on how you’ve set this up, you’ll wanna add all the “In sequence xxx” to this area EXCEPT for the one you created for this sequence.
To do this, simply click on the Tags area and choose your tags. Don’t forget to hit save!
Now, rinse and repeat for all your other sequences, remembering to exclude the tag that relates to that sequence though, otherwise, NONE of your sequences will fire! ?
Step 4: Add completed tags
THIS STEP IS SUPER IMPORTANT! Sorry for yelling, but if you don’t do this step, then you’re going to have a massive mess on your hands… trust me on this one!
For all your sequences, you’ll need to add an additional automation rule as follows:
- Trigger = Completes a sequence (your sequence)
- Action = Remove tag (your “In Sequence xxx tag)
Super simple, but also super important. Failure to do this will stop your subscribers from receiving any of the other sequences they’ve subscribed to.
There’s an additional level of complexity to this that goes beyond what I’m talking about here. For more details on this and to check if it’s even relevant to you, visit the ConvertKit Queen, Elizabeth Goddard and learn about “In Sequence” Segmenting.
Obviously, you’re going to need to sit down and do a bit of planning and forethought about this email automation rule. Don’t forget about your paid products/services too. If you’ve got sequences set up for them, then they trump anything else, so make sure that you allow those to go out unfiltered.
Email Automation #3: Custom Unsubscribe Links
This is also one of my fav email automation rules. Remember all those sequences you’ve got going on? Another way to reduce the level of ‘noise’ in your subscriber’s inbox is to offer them a quick way to unsubscribe from a specific sequence or topic but still remain on your list.
Something I’m sure you’d want to foster, right? We all love options, yes? So why not give your subscribers options too!
This one is super simple, but again, requires you to THINK about your email funnels.
Step 1: Choose a URL
Just like in automation rule #1 above, we’re going to be creating a link click trigger, so we need a URL to send your subscriber to when they click the custom unsubscribe link.
The best way to do this? Create a special page on your website that is like a thank you page… but thanks them for unsubscribing.
Here’s what I use for Hustle & Groove:
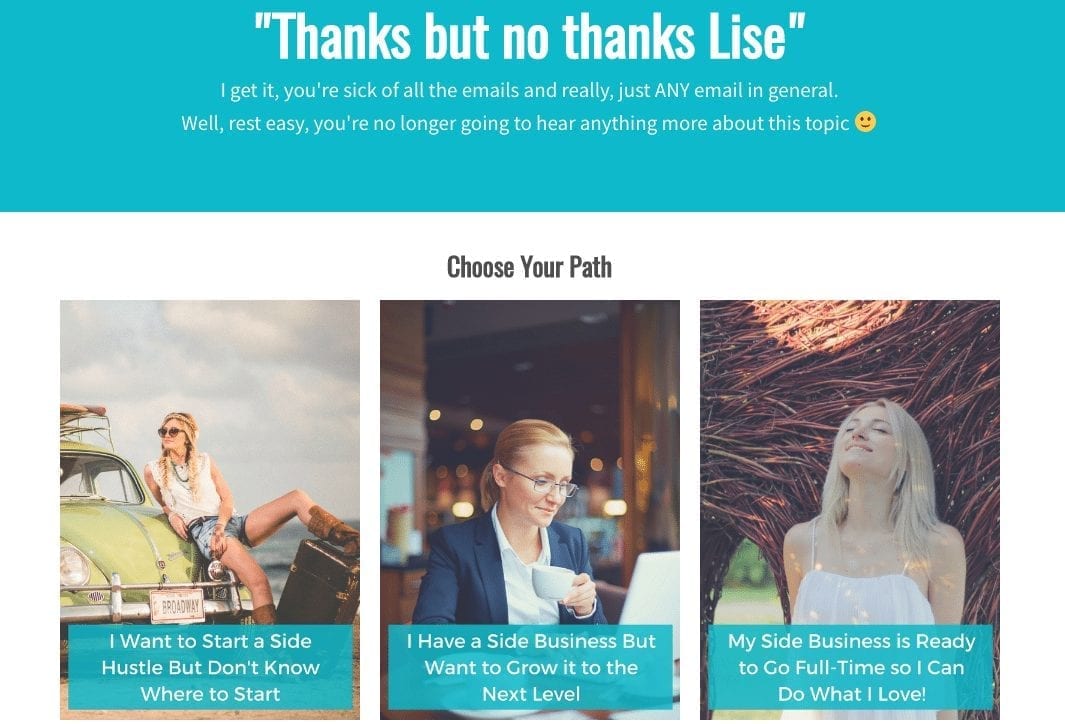
Create something that works for your audience, but keep it simple and clean.
Step 2: Create link click your rule
Here’s what that’s going to look like:
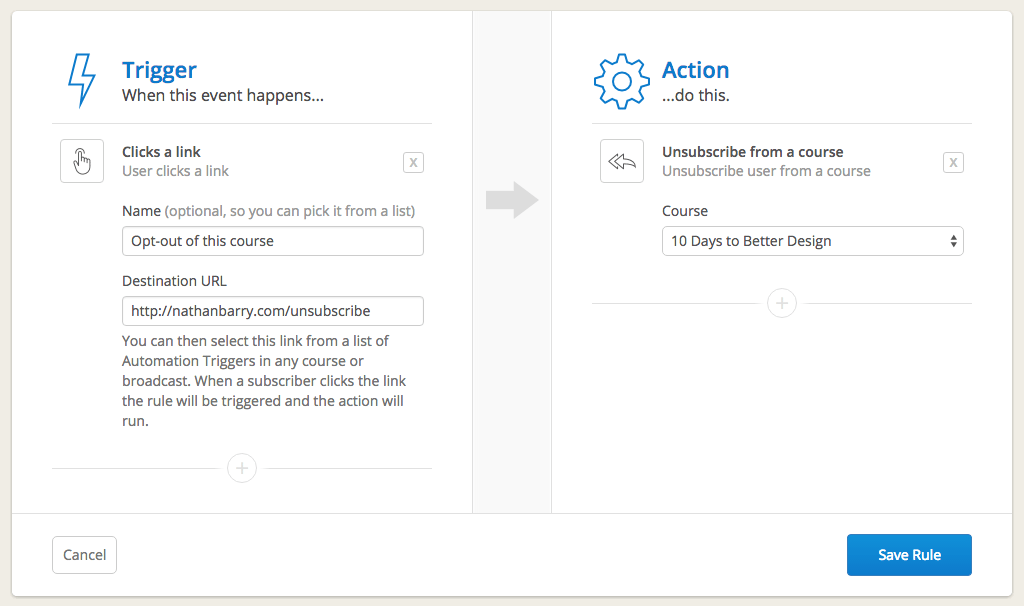
Replace this with your details. So instead, of ‘Unsubscribe from course’, it might be ‘Remove tag’, or it might be to add a tag, which is what I do if I’m looking to exclude someone from a specific topic.
Step 3: Create your hyperlink
Now, you want to head over to your email sequence or broadcast and setup your unsubscribe hyperlink trigger.
If you’re looking to remove someone from a topic, then add this in your PS area and write something the lines of:
“Not interested in hearing about self-publishing or author related stuff? Simply click here to stop any further emails on this topic.”
The hyperlink trigger is added to the “click here” text.
If you want to remove them from a sequence or course, you’ll need to head into a more advanced area, which is better described by this ConvertKit help article.
The key to this particular email automation rule being effective is making sure that you also exclude these tags from your broadcasts so that you don’t annoy the people who click the link!
If you don’t do this extra step with your broadcasts, you’re gonna piss people off, plain and simple. And then they will unsubscribe from your ENTIRE list.
So heed my caution.
[divider style=”0″]
What’s Next?
Phew. I know that was a mammoth of a blog post. Thanks for sticking around!
You’ve learned how to segment your subscribers, how to not overwhelm your new subscribers, and how to create custom unsubscribe links, so that you can give your subscriber the choice to opt-out of specific topics or sequences, WITHOUT bailing out on your entire list.
Bookmark this page and get your email automation rules setup. It’s the fastest way to email marketing mastery and will help you better serve your audience.
6 replies to "3 Powerful Email Automation Rules to Rock Your Business"
Great overview and process. The first rule of automation, you can’t automate what you don’t “see”. Visualization is the best way to simplify your processes, so I love your whiteboard.
Agree Nancy!
I haven’t used convertkit yet, but I do want to learn about automation and this article is really helpful. If I do switchover, I’ll be sure to visit I this article for more details.
Abbey, ConvertKit is amazing, and it’s about to get even more amazing as they switch to a visual automation rule builder!
WOW! So much valuable information! I am currently setting everything up – website, email provider, lead magnets, etc. so the timing on this is perfect! I have been going slow, trying to set things up properly from the get-go because I know if I don’t I WILL get overwhelmed when the shift hits the fan and this was exactly what I needed to help with my email tags and funnels. (Now to print this out so I can read it over half a dozen times to really start to make sense…LOL!) Thank you, thank you, thank you!!!
I’m glad you found it helpful Jodie! Keep doing what you’re doing and you’ll get it all in place!