One of the biggest questions I’m asked is: “why do I need an email list and how do I start one?”
This is then generally followed up with a lengthy email response from me, concluding in the popular saying, “the money is in the list!”
But that’s not really helpful, right?
So rather than continue to type one-off responses to this question, I’m going to write this blog post to help anyone new who has just started their blog or business.
Table of Contents
Here’s what you’re gonna learn today:
- Why you need an email list
- The tools you should be using
- How to start an email list
- Ready? Let’s jump straight in.
Why You Need an Email List
One of the main reasons you want an email list as you build your blog or business is so you can build strong relationships with your target audience.
You can build this relationship by connecting with your audience on a weekly basis inside their inbox.
But probably the number one reason you want to build an email list right now is because you own your list!
If you’re selling books or products on Amazon, who do you think own’s your customer’s email? You?
No, Amazon does. Amazon handles the purchase for you, but they don’t pass on any details to you about your customers.
The only way that happens is if your reader joins your email list through a link inside your book or product information page.
The same goes for other platforms like Facebook (although if you’re paying for lead generation ads, that’s different) and Instagram. You might have 1,000’s of followers, but you can’t see their email addresses unless they join your list. And you definitely can’t reach them all unless you’re paying for it…
Another great thing about having your own email list is that you don’t have to worry about changes in algorithms to reach your target audience.
Facebook is notorious for changing their algorithms, as is Amazon.
It’s about not having all your eggs in one basket… unless that basket is your own email list!
[Tweet “the number one reason you want to build an email list now is because you own your list!”]
Still not convinced you need an email list?
Have you considered that once you have a list, you’re now able to market to them on your own time? You don’t have to wait for certain conditions to be met or for your budget to kick over for another month.
It’s free to market to your list… and that leads to making sales. You can setup automated sales funnels within your list that you wouldn’t be able to do if your list was hanging out on Facebook or Instagram.
The Tools You Need to Build an Email List
Before you can start building your list, you’ll need to invest in some tools.
#1: Email Service Provider
You’ll need an email service provider, such as MailChimp, ConvertKit or Active Campaign.
You don’t have to spend a lot of money, but you do need to make sure you’ve got access to automated email sequences and unfortunately, the free options don’t allow you to do that.
I know a lot of people say that you can start off with the free version of MailChimp, but I completely disagree with that.
The free version doesn’t give you access to autoresponders, or email sequences, as they’re called in ConverKit. And without access to autoresponders, your life is going to be a lot harder.
And it will be a lot harder to build your email list too.
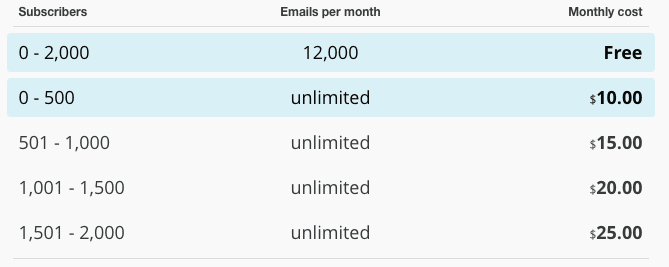
If budget is an issue, start with MailChimp, which is $10 a month for your first 500 subscribers. From there, it increases by $5 per month (see below).
Don’t let the free version tempt you… you can’t do any automation with the free version, which means you’ll have to manage all your emails manually – yuck!
The biggest issue with MailChimp (which I used for the first 3 years of Hustle & Groove) is that they count a subscriber based on the list they belong to.
So for example, let’s say you had an email list for your newsletter, then you had one for your lead magnet (freebie) and another for your webinars.
You might have the same subscriber (using one email address) on all three of those lists.
MailChimp will count that subscriber three times.
It’s a VERY frustrating thing and while you can segment and group your list inside MailChimp, it’s not as easy to do as it is inside Active Campaign or ConvertKit.
It pays to be aware of this upfront. So if budget is your main concern, ConvertKit (free) is your best option.
If you want to access the best from the get-go, then Active Campaign or Convertkit are your best (paid) options.
I personally use Convertkit and LOVE it.
#2: Opt-in Forms
The next tool you’ll need is the ability to collect email addresses.
You normally do this through the use of an opt-in form. All email service providers have either a plugin you can use with your website or the ability to embed their forms on your site.
If you have a premium theme on WordPress or Squarespace, opt-in forms might already be built in.
A couple of WordPress theme’s that have this include OptimizePress (which is what I use), Thrive and Divi.
These opt-in forms will be used extensively throughout your site, so make sure you’ve got access to them.
Another option is to use a plugin like Optin Monster, which provides you with a lot of customizations that might make things a bit easier. This plugin is for WordPress only and starts at $19 per month.
If you’ve got OptimizePress, Thrive or Divi, you don’t need Optin Monster though 🙂
Here’s the opt-in form for the Hustle & Groove ‘secret’ vault (if you’re not already a member, you should join!) — created using OptimizePress:
[optin_box style=”12″ alignment=”center” email_field=”email” email_default=”Enter your email address” integration_type=”convertkit” double_optin=”Y” thank_you_page=”https://hustleandgroove.com/thanksforsubscribing” list=”42312″ name_field=”name” name_default=”Enter your first name” name_required=”N” opm_packages=””][optin_box_field name=”headline”][/optin_box_field][optin_box_field name=”paragraph”]PHA+PGEgaHJlZj0iaHR0cDovL3d3dy5odXN0bGVhbmRncm9vdmUuY29tL3dwLWNvbnRlbnQvdXBsb2Fkcy8yMDE2LzA0L0pPSU4tVEhFLUhHLVNFQ1JFVC1WQVVMVC5qcGciPjxpbWcgY2xhc3M9ImFsaWduY2VudGVyIHNpemUtZnVsbCB3cC1pbWFnZS0zNDYzIiBzcmM9Imh0dHA6Ly93d3cuaHVzdGxlYW5kZ3Jvb3ZlLmNvbS93cC1jb250ZW50L3VwbG9hZHMvMjAxNi8wNC9KT0lOLVRIRS1IRy1TRUNSRVQtVkFVTFQuanBnIiBhbHQ9IkpvaW4gdGhlIEgmYW1wO0cgU2VjcmV0IFZhdWx0IHRvZGF5ISIgd2lkdGg9IjcwMCIgaGVpZ2h0PSIzMDAiLz48L2E+PC9wPgo=[/optin_box_field][optin_box_field name=”privacy”]We value your privacy and would never spam you — that’s just gross. You can unsubscribe at anytime.[/optin_box_field][optin_box_field name=”top_color”]undefined[/optin_box_field][optin_box_button type=”1″ text=”Access Now” text_size=”20″ text_color=”#ffffff” text_font=”Montserrat;google” text_bold=”Y” text_letter_spacing=”0″ text_shadow_panel=”Y” text_shadow_vertical=”1″ text_shadow_horizontal=”0″ text_shadow_color=”#0eb9cb” text_shadow_blur=”0″ styling_width=”20″ styling_height=”17″ styling_border_color=”#027381″ styling_border_size=”1″ styling_border_radius=”6″ styling_border_opacity=”100″ styling_shine=”Y” styling_gradient_start_color=”#0eb9cb” styling_gradient_end_color=”#027381″ drop_shadow_panel=”Y” drop_shadow_vertical=”1″ drop_shadow_horizontal=”0″ drop_shadow_blur=”1″ drop_shadow_spread=”0″ drop_shadow_color=”#027381″ drop_shadow_opacity=”50″ inset_shadow_panel=”Y” inset_shadow_vertical=”0″ inset_shadow_horizontal=”0″ inset_shadow_blur=”0″ inset_shadow_spread=”1″ inset_shadow_color=”#0eb9cb” inset_shadow_opacity=”50″ location=”optin_box_style_12″ button_below=”Y”]Access Now[/optin_box_button] [/optin_box]
#3: Landing Pages
At some point in the process of building your email list, you’ll want more than just an opt-in form.
This is where landing pages come in. Now again, depending on your site’s theme, this could already be part of your core theme functionality.
Squarespace definitely has you covered on this aspect and some WordPress themes also do, including OptimizePress (which is very similar to LeadPages), Thrive and Divi.
Another option is to use a landing page service, such as LeadPages or Instapage. I’ve used both before and still prefer OptimizePress.
It really comes down to your budget and what your preferences are.
If your site’s theme allows you to build beautiful landing pages, then stick with it. You’ll save yourself a ton of money.
As I mentioned, I use OptimizePress, which is a one-time payment of $97 for 3 licenses and an annual maintenance fee of $30. I don’t need to pay for any plugins for opt-in forms or landing pages because this is built into my theme.
In comparison, if you were using LeadPages, you’d be looking at paying $37 per month to get access. Instapage is $29 per month.
Look at your theme carefully before you pay for any of these tools.
Wanna see a live example of a landing page? Click here to see what I use for people joining the free 5-Day Challenge.
#4: Image Creation Software
You’ll need to be able to create images to go along with your opt-in forms and landing pages and your best solution for this is using canva.com.
It’s free and extremely easy to use. For someone like me, who is not a designer, I can go into Canva and create beautiful images with a few clicks of my mouse.
Some other options include Pic Monkey and Fotor. It’s really what works for use, just make sure you’ve got access to something.
Ok, now that we’ve covered the tools you’ll need, let’s look at how you get started.
How to Start Building Your Email List
There are two main parts to building your email list:
- Giving something away in exchange for an email address
- Getting traffic to your free giveaway
Both of these work in conjunction together and help build your list.
Without either component, it becomes quite difficult and slow to build a list.
#1: Decide on a Freebie
Before you can start building your email list, you’ll need to take a step back and park yourself in the shoes of your target audience.
Ask yourself this question: “What would make me hand over my email address?”
Or put it another way, “What’s in it for me?”
Your freebie (or lead magnet) is an incentive for your target audience to hand over their email address to get on your list and grab the freebie.
Just having a sign-up form on your website that says “Join my newsletter for the latest tips and tricks” isn’t gonna cut it anymore.
In fact, if you have this on your website right now, by the end of this blog post, you’ll have replaced it with something way better!
So what could you use as a freebie? What could you giveaway to your new subscriber?
Here are some ideas to consider:
- A special discount code
- A sample of your product
- A free consultation
- A checklist or report
- A guide
- Access to a free challenge
- Templates
- Email course
- Preview of your video course
This list could go on and on. The premise is that you’re giving away something that has a high perceived value to your subscriber, or it will benefit them in some way—help them solve a problem.
Basically, they are eager to give you their email address because they need or want what you’re giving away.
Stuck for ideas?
Check out these examples:
5-Day Challenge on the H&G Blog
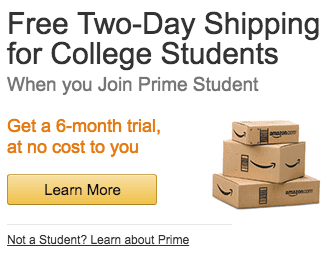
Amazon: Free shipping if you’re a Prime member (image)
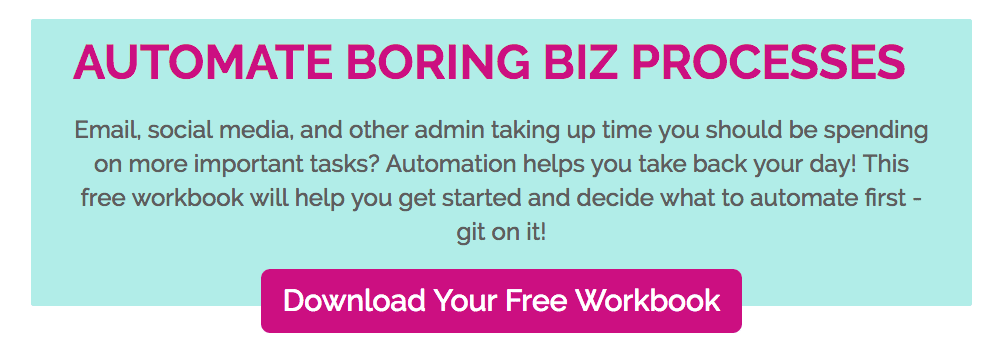
Free Workbook to help figure out your automation via Brittany Berger
30-Day Challenges at Uncork Your Dork
These are some great ideas and also good examples of opt-in forms and landing pages.
Once you’ve got one freebie sorted, you can duplicate the process as many times as you want.
You could have freebies for specific blog posts, often referred to as ‘content upgrades’ (something I do often) and you could create freebies for each product or service launch you do, particularly if it relates to your paid product (which is your ultimate goal).
But for now, if you don’t have a product or service quite mapped out, create a freebie that is meaningful for your audience and get it set it up on your website using your opt-in forms and landing pages.
#2: Drive Traffic to Your Freebie
Now that you’ve got your freebie created and set-up on your site, it’s time to get some eyeballs on it.
There are several ways that you can do this, and a lot of them are free.
It’s time to put your thinking cap on and think about the different ways your target audience could find you.
To help, here’s a list of where you should be adding your freebie link (either to your opt-in form or landing page):
- Inside your blog posts (3-4 times)
- Blog header
- Bar across the top of your site (called Smart Bar in SumoMe or Hello Bar in Hello Bar)
- Your blogs navigation menu
- Your social media bio’s
- Mention it inside Facebook Groups (when allowed)
- Your social media accounts (as a post)
- In your guest post bio’s
- About and contact pages
- Inside a website pop-up
- Thank you page sharing
All of those strategies are free. It doesn’t cost you anything to add your link (or pretty image) to any of those areas.
But there is only so much reach you’ll get through these avenues.
If you’ve got a freebie that relates to a paid product, then it’s a good idea to invest in some paid advertising on Facebook or Pinterest.
For those of us outside the UK, Canada and the USA, promoted pins are not available and we’re stuck with Facebook ads or Google Adwords. Boo 🙁
Promoted pins are a great way to promote your freebies, particularly if you use the strategy I’m about to share with you, and the same goes for Facebook ads too.
Side Note: You can and should still create beautiful pins for your blog posts and share them on Pinterest. If you belong to a number of groups, you’ll get some great traction posting your pins inside these groups too.
Paid Traffic Strategy
[feature_box_creator style=”1″ width=”700″ top_margin=”5″ bottom_margin=”5″ top_padding=”5″ right_padding=”” bottom_padding=”5″ left_padding=”” alignment=”center” bg_color=”#75d7e1″ bg_color_end=”#0eb9cb” border_color=”” border_weight=”” border_radius=”” border_style=”” font_size=”14″ font_font=”Montserrat” font_shadow=”none”]
Step 1: Make sure you’re freebie has been linked to 3-4 times within a popular blog post you’ve created. The freebie should relate to the blog post. If you want to see an example, click here to see what I’m talking about.
Step 2: Create a beautiful, eye-catching image. If you’re doing Promoted Pins, make sure you mention the freebie on the image. If you’re doing Facebook ads, consider creating a slideshow or video to promote your blog post as images don’t have the same reach as video’s do.
Step 3: Make sure you’re driving traffic to read your blog post. Don’t send them to your main URL. Send them to the blog post URL instead… the blog post that has your freebie links sprinkled throughout it!
Step 4: Provide a strong call to action within your ad. This could be something like “Click or tap here to get the …” or “Click or tap here to join for free” or “Click or tap here to start now”
Step 5: Set a low budget (on Pinterest, you can get away with $1 a day and get amazing reach. On Facebook, you’ll need to start around $5 a day) and run the ad for as long as you want. A good length of time is at least 7 days, but if you can budget it, 30 days is best.
You’ll need to pay close attention to click-through rates and conversion rates in terms of people who join your email list via your ad. The higher the conversion rate, the better. This also indicates that the image, video and copy are spot on.
[/feature_box_creator]
If you’re doing Facebook ads, don’t forget to add your pixel code to your blog post AND your thank you page so you can accurately track conversions.
The great thing about using Facebook ads is that you can then re-target these people by creating custom audiences and promoting your paid product to them too.
Now it’s Your Turn
You’re now equipped to get your email list up and running. Create your freebie, connect it all up to your email service provider and promote the heck out of it!


7 replies to "Why Do I Need an Email List? (and How to Get Started)"
These are great opt-in ideas. Email is most assuredly where you develop relationships.
Keep up the great work and live unstoppable!
These are really great tips. I have been struggling getting email followers. I know it’s important, but the things I’ve tried haven’t worked.
Hi Barrie, it can be hard to get going, but once you focus on the right strategies, it all comes together. Really, it’s about having a good lead magnet and driving traffic to the lead magnet every day. If you do that, then you’re email list will grow exponentially 🙂
Thank you so much for all of this great info! I’ve been meaning to work on growing my email list for a long time, but I’m overwhelmed and have no idea how I would even use it yet. Pinning this so I can reference it and put something into action. Thanks!
Hi Kristin, I’m so glad you found it helpful! If you have any products or service you plan to create in the future, building your list now will help make those profitable from day one. Plus, you build relationships faster through an email list, particularly if you’re communicating with your readers weekly via their inbox 🙂 Good luck!
Lise, it is no longer true that you do not have access to Mailchimp’s autoresponders in their free account. To wit:
https://mailchimp.com/resources/announcing-free-marketing-automation-for-everyone/
Thanks for the link Gary. While Mailchimp do provide this now, it is limited. But it’s about working with what you like. Personally, Mailchimp was awesome for my first 3 years, then it wasn’t.