Starting a blog. Seems simple enough, right? All you need is a WordPress site, a blog name and you’re good to go…
But, it’s not that simple, is it? Particularly if you want to turn your blog into a serious business. A creative business that will eventually replace your day job.
That type of blog? That needs a bit of forethought, particularly around what things to spend money on when you’re just starting out.
To get the most bang for your buck, there are some key investments you can make to set your blog up for success.
There are tools and apps that will propel your blog forward faster, while others will slow you down.
Table of Contents
I hear questions like:
“I would love to use ConvertKit, but not sure if it’s worth it or how to use it.”
“Facebook vs. Pinterest?”
“Should I invest in webinar software?”
“Should I invest in Boardbooster or Buffer?”
That’s what I’m going to cover, plus so much more, in this epic post. Making sure you spend your money on the right things when starting a blog — your blog.
10 Tools and Apps for Starting a Blog (where to invest your money)
#1: WordPress (hosted) + Domain Name
My number one site for hosting a blog or website is WordPress. Yes, there are other options, but WordPress, in my opinion, provides you with the most options to customise a site the way you want it to look.
Now, don’t get confused between WordPress.com and WordPress.org. They might look the same, but they are very different.
WordPress.org is what you’re looking for when starting a blog.
It provides you with a single installation of WordPress which can be hosted with your chosen hosting company.
I use SiteGround but have used Hostgator in the past too. Both offer great options for WordPress users.
If you’re a little tech-phobic, I’d recommend SiteGround, as they’ll manage the installation of WordPress for you.
Hosting plans typically start at around $5 USD per month, so it’s definitely affordable.
Once you’ve decided on which host you’re going to run with, you need a blog name aka your domain. I use GoDaddy.com to buy all my domain names, but you can do this through your host as well.
If you’re struggling to come up with a name for your blog or website, check out the business name generator that Shopify provides free.
It gives you a real-time view of domains available and all you have to do is provide a starting point and then it will generate ideas for you.
I used this when I rebranded Hustle & Groove — so helpful and it generates more ideas than you can think of on your own.
In terms of themes for WordPress, I use OptimizePress2, which is a premium theme.
If you’re budget-conscious, there are loads of free themes you can use straight out of the box.
When I first started my blog, I used the WordPress Twenty Twenty theme. It doesn’t provide a ton of customizations, but it will get you up and running.
My recommendation, though?
Save yourself the hassle of changing themes by going with a premium theme, to begin with. It’s worth the investment and will save you a lot of stress and headaches if you do this right off the bat.
You can find some great premium themes on Creative Market and ThemeForest.
The next tools and apps are where you’ll start to connect with readers and start to see some traction with your blog.
Just don’t forget to have some content on your blog before you start implementing any of the following tools. You only need to start with five blog posts, so it’s not too hard to get going.
#2: ConvertKit
Previously, I recommended MailChimp for bloggers, but honestly, I just can’t do it anymore.
Since moving to ConvertKit 4 months ago, I’ve seen a 50% increase in email open rates and opt-ins!
What is ConvertKit?
It’s an email marketing tool.
One of the first things you should focus on when starting a blog is building your email list.
Yes, I know it can seem expensive, to begin with, but compare this with the limitations MailChimp currently has:
[bullet_block style=”size-16″ small_icon=”15.png” width=”” alignment=”center”]
- MC charges you by subscriber, not by email. So a person can join many lists you have on your site and MailChimp will count them per list they belong to. ConvertKit counts by email address only, not by list membership.
- Automation rules are limited. There is no way to move someone from one autoresponder to another based on the actions they take inside your emails.
- MC’s free plan only allows you to send broadcasts (bulk emails), there is no autoresponder setup, which means you’ll need to set this up once you reach 2,000 subscribers, or spend time setting up broadcasts each week = time-consuming!
- Their plans start at $10 USD for 500 subscribers (which gives you access to the autoresponder features), but if you’ve been using their free plan and reach 2,000+ subscribers, and switch to a paid plan, you’ll be looking at $50 USD per month.
[/bullet_block]
I do understand that for some, getting started with ConvertKit seems expensive, but you should weigh up the costs to you further down the track before making a decision.
ConvertKit has a ton of features that MailChimp does not, and these include:
a. Tagging
Probably one of the best features inside CK. Tagging allows you to get really smart with your email marketing and segment your list based on the way a subscriber has been tagged.
For example, if you’ve picked up a freebie from Hustle & Groove, you’ll be tagged specifically as grabbing that freebie.
Let’s look at an example, so it makes a bit more sense:
[video_player type=”youtube” width=”853″ height=”480″ align=”center” margin_top=”0″ margin_bottom=”20″]aHR0cHM6Ly95b3V0dS5iZS9oOXdRVlBpeDB0RQ==[/video_player]
One thing I will say is that if you’re going to make the best use of the tagging function, then you need to keep track of your tags. I do this in a spreadsheet which maps out what each tag means and any email sequences that relate to it. It definitely makes keeping track of tags a lot easier.
Grab the tagging spreadsheet below so you don’t go insane!
b. Automation Rules
This is where CK really shines, in my opinion. With their amazing automation rules, you can create events based on what a subscriber does.
For example:
Subscriber 1 joins via your main lead magnet. CK will tag them, deliver the lead magnet and start them on an automated sequence. Once that sequence is finished, CK will then move Subscriber 1 to another sequence based on their behaviours, or things they’ve clicked on.
Subscriber 2 joins via a content upgrade. CK will tag them based on the topic of the content upgrade and start them on an automated onboarding sequence. Once Subscriber 2 finishes that, CK will tag them for the newsletter and move them onto that sequence.
All of this happens auto-magically.
So yeah, it’s pretty awesome.
[video_player type=”youtube” width=”853″ height=”480″ align=”center” margin_top=”0″ margin_bottom=”20″]aHR0cHM6Ly95b3V0dS5iZS9idlRDQnR5dDFJZw==[/video_player]
c. Lead Magnet Delivery
CK is awesome at making this part of the blogging process so easy.
Do you want to provide content upgrades on multiple blog posts but don’t want to have to upload them to WordPress (where they take up space) or Dropbox etc? CK can definitely take care of this for you.
When you set up a form inside CK, you can deliver your content upgrade or lead magnet as soon as someone confirms their email address.
This is one of my fav features.
It definitely makes delivering freebies to your readers a whole lot easier.
If you don’t want to do this, you can still host your lead magnets on a thank you page instead, but for ease of delivery and for instant access, I prefer the auto-magic delivery!
[video_player type=”youtube” width=”853″ height=”480″ align=”center” margin_top=”0″ margin_bottom=”20″]aHR0cHM6Ly95b3V0dS5iZS9WUlJUa05wdXhXdw==[/video_player]
Honestly, I personally feel that the investment in CK upfront is worth it, and out of all the tools mentioned in this post, CK would be the one thing I recommend you invest in first.
It will make your life easier and allow you to grow your email list fast. MailChimp is good, but it just doesn’t meet the functionality that CK has.
#3: Pinterest & Boardbooster
I’ve been an avid user of Pinterest for a few years now.
I used it to plan my wedding in 2013/2014 and more recently, I’ve been using it to look for inspiration for book ideas, cover ideas, and business-blog-related stuff.
I’ve also got a secret board for children stuff, seen as how we’re planning for a baby… you might say I’m a bit addicted to Pinterest!
Until April 2016, I had no idea how powerful Pinterest could be for my blog. Until Melyssa Griffin introduced me to some of her list building strategies, with number one on her list being Pinterest.
Since implementing her tips, my Pinterest account has grown by 200%! I went from having 800 or so followers in April to over 3k followers in July.
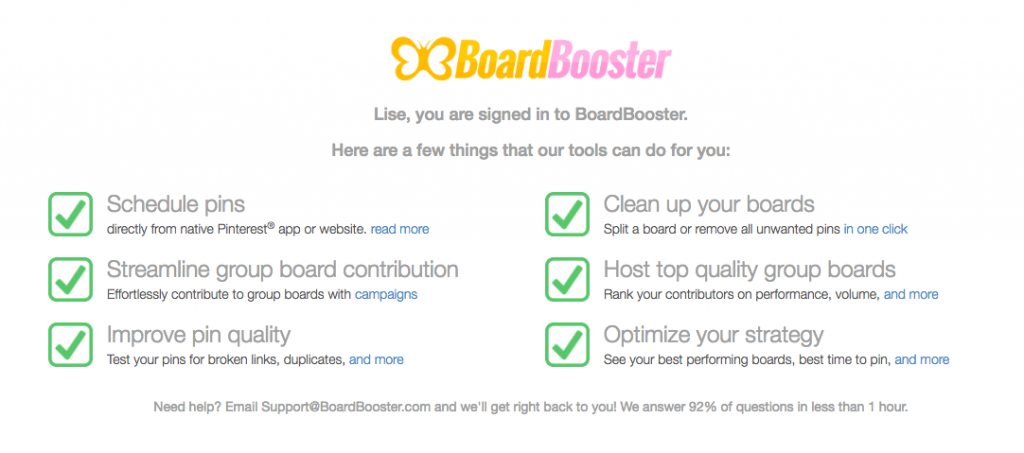
A large part of this was due to Boardbooster.
Using Boardbooster
Yes, you can use tools like Buffer and CoSchedule to pin your blog posts to your boards, but you can’t use those tools to loop your old pins, schedule pins to group boards and create campaigns specific to your topic.
Boardboaster is definitely one of my fav blogging tools and one I wish I’d had access to when I first started my blog.
Their plans are really budget-friendly, starting at just $5 USD per month. I recommend at least starting at the $10 per month price point though as this will allow you to pin and repin up to 1000 pins each month.
This is where you’ll see fast growth and where the magic happens. Pinterest loves fresh content, but it also loves content that is engaging and shared (pinned) across Pinterest.
Pinterest loves active users and users that provide quality pins and share quality pins.
Boardbooster allows you to be active during the day and ensures that you’re only sharing the best pins. You don’t need to be on Pinterest 24/7, because Boardbooster is doing this for you.
I love their maintenance tools, which I use every other month, to clean up my own boards and remove pins that no longer link to a website or that have been marked as spam.
I continue to see a lot of growth and traffic from Pinterest to my blog and it’s definitely my number one traffic referrer and helps get me new subscribers onto my email list.
[video_player type=”youtube” width=”853″ height=”480″ align=”center” margin_top=”0″ margin_bottom=”20″]aHR0cHM6Ly95b3V0dS5iZS9IVURmbl9SV28wQQ==[/video_player]
#4: Buffer
In terms of social media sharing and scheduling, Buffer is my go-to tool.
You can get started with their free account, but upgrading to the paid version provides you with a lot more options.
At only $10 USD per month, why wouldn’t you?
With the pro version of Buffer, you can add RSS feeds to your social media accounts of your favourite blogs. This means you don’t have to go hunting for new content, you just log into Buffer and access your feeds there.
This makes sharing awesome content with your followers a lot easier and allows you to connect with your blog readers too.
I tend to schedule a week’s worth of social media content each Sunday and it takes me about an hour or so to do this.
I do this sitting in a comfy chair in my lounge while watching one of my fav programs from HGTV!
We’re a little addicted to house renovations, tree houses and bargain beachfront properties in the Cartwright household 🙂
The best part about Buffer is that you can set up time’s to post per social media account.
Here’s what that all looks like in action:
[video_player type=”youtube” width=”853″ height=”480″ align=”center” margin_top=”0″ margin_bottom=”20″]aHR0cHM6Ly95b3V0dS5iZS9XZXE3TGo5MzJFdw==[/video_player]
#5: CoSchedule
Now, while I use Buffer to schedule other people’s content, I use CoSchedule to share my blog posts across my social media accounts.
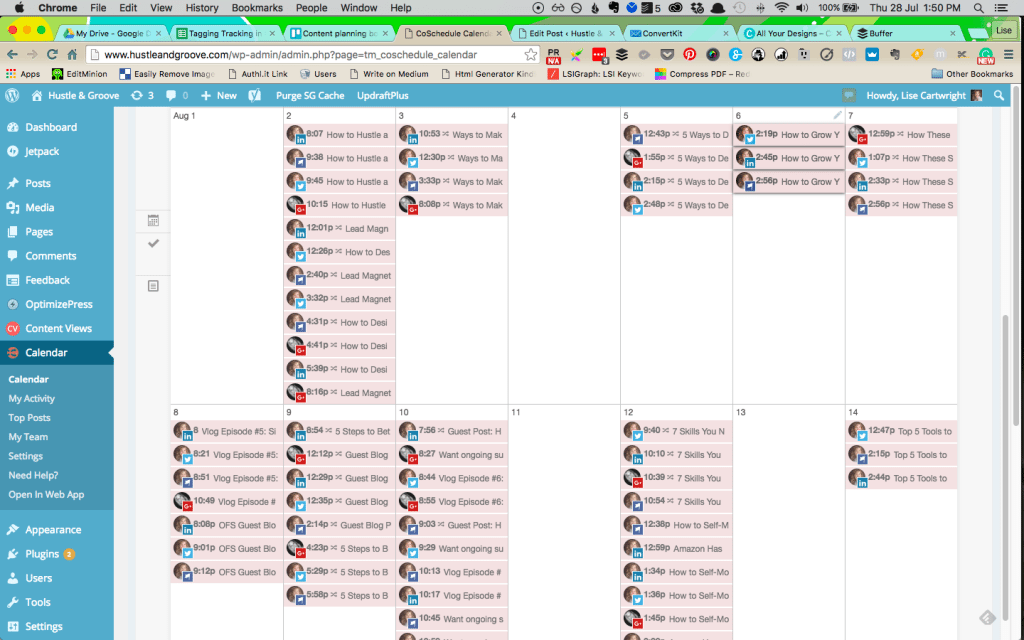
What’s great about CoSchedule is that it’s a plugin that sits within my WordPress blog and acts as my editorial calendar.
I can see six weeks ahead and when I publish a post, I follow CoSchedule’s recommended sharing schedule of:
- Share on post time
- Share next day
- Share 7 days later
- Share 1 month later
- Share 3 months later
I can also create social media images for each account if I wanted to and schedule even more posts into the future if I wanted.
The reason I don’t go beyond the 3 months is that I also use a (free) plugin called “revive old posts” that allows me to reshare old blog posts to Twitter and Facebook on an ongoing basis.
Pinterest is already taken care of by Boardbooster, and I’m not worried about LinkedIn or Google+ because these are my least active platforms…
And that’s key to your social media strategy. Before you get too carried away, do a little bit of research to find out where your target audience is likely to be hanging out.
Pinterest, Twitter, and Facebook are my three top platforms, and in that order. I spend the most of my time and investment on Pinterest, then Twitter, then Facebook.
#6: Akismet
No matter what blogging platform you end up going with (although why would you NOT use WordPress?!), you need a way to manage the crazy amount of spam comments you’ll start to get the minute you start sharing your blog posts on social media.
That’s where Akismet comes in. At just $5 per month, you can manage comment spam and not have to worry about your blog posts linking to dodgy sites.
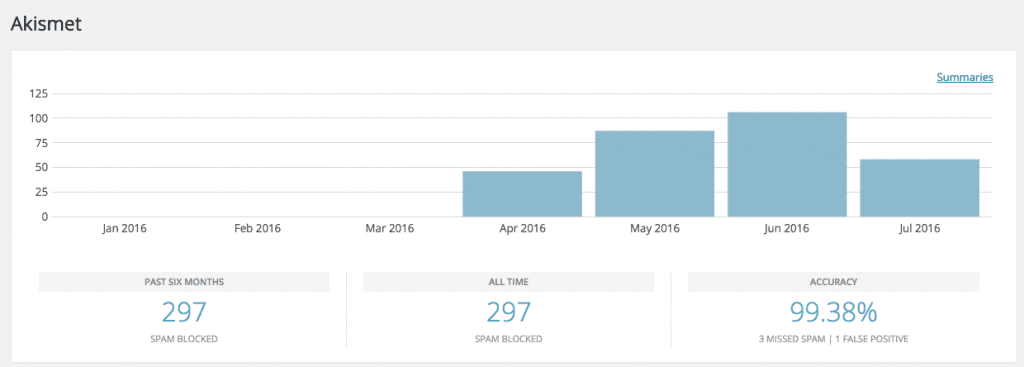
Here’s a screenshot of what Akismet has captured in the last few months… it’s nuts! This is just since I switched domains…
You can definitely opt for the free version or the “pay what you want” option, but at less than a large cup of coffee (on this side of the world, a large coffee is over $5!) you’ll get a lot more options with managing your spam.
#7: PrettyLink (lite)
While this isn’t a must-have when starting a blog, it will help you look more professional.
How?
By allowing you to create pretty, brandable links that make your readers think you’ve got hookups left, right and centre!
I’ve been using PrettyLinks for over three years and would be lost without it, particularly when things can change so much in the online world and you need to replace a URL…
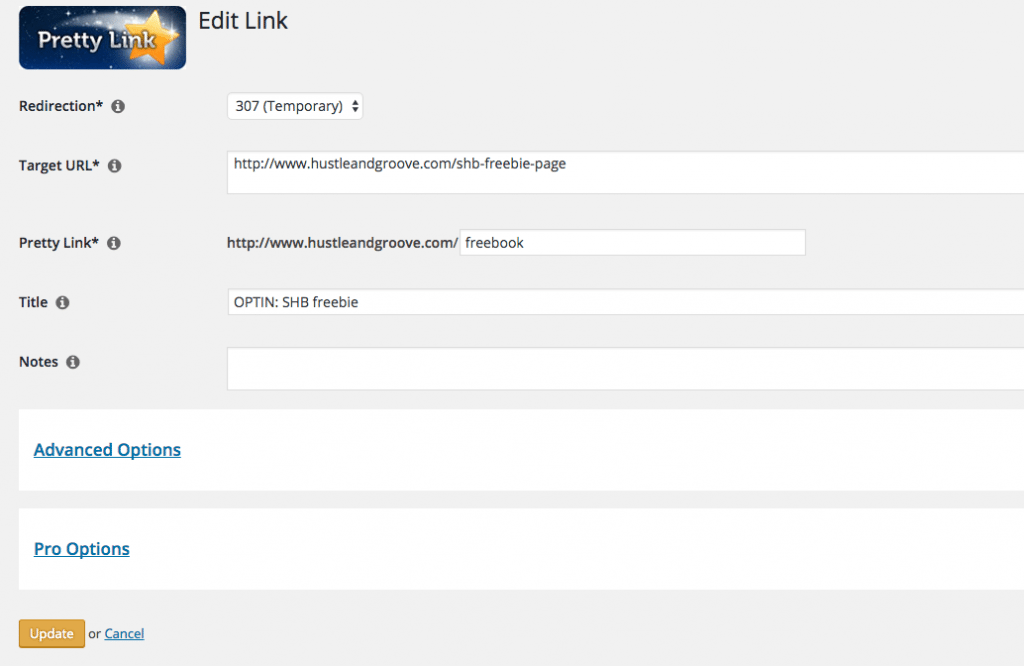
How does it work? It’s simple: you grab the original URL of the page, post, or website you want to share, paste it into PrettyLink and then customise how that link looks.
Here’s a screenshot of how this looks behind the scenes:
Where this becomes really powerful is in the tracking. You can see how often your link is clicked and you can add UTM parameters to track it in Google Analytics too.
PrettyLinks makes life easier and it’s free, so really, why wouldn’t you use it?
[feature_box_creator style=”1″ width=”700″ top_margin=”5″ bottom_margin=”5″ top_padding=”5″ right_padding=”” bottom_padding=”5″ left_padding=”” alignment=”center” bg_color=”#75d7e1″ bg_color_end=”#0eb9cb” border_color=”” border_weight=”” border_radius=”” border_style=”” font_size=”14″ font_font=”Montserrat” font_shadow=”none”]
Pro Tip: If you have any affiliate links you want to share with your readers, make life easier by giving your readers a link that looks something like this: www.hustleandgroove.com/freshbooks (i.e., yourwebsite.com/affiliatelink)
[/feature_box_creator]
#8: LSI Keywords
If you want to make your blog posts super useful to your readers, you’ll include information that is relevant to your topic, right?
Of course, that’s a given.
But what about the keyword of your blog post? Have you thought about how you could incorporate long-tail keywords and related keywords into your blog post?
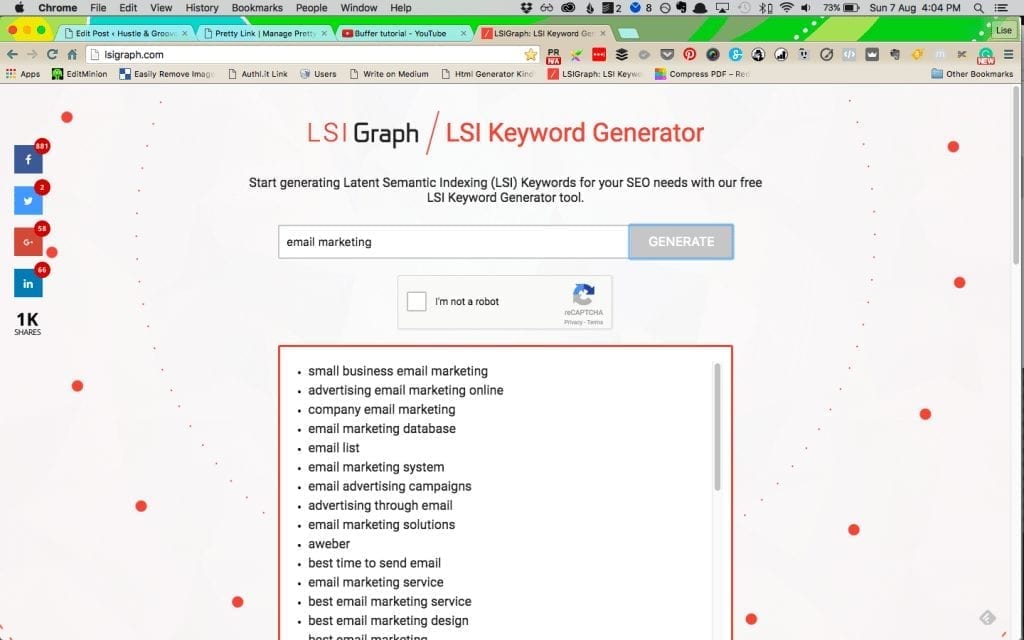
Don’t worry, neither did I until I came across this tool a few years go. The LSI keyword tool allows you to enter your main keyword and then it spurts out a number of long-tail and related keywords that you can use in your blog post.
I generally aim to have at least another 5-8 keywords on top of my main keyword peppered throughout blog posts. But, only choose the ones that make sense, otherwise, you’ll look like you’re keyword stuffing.
Here’s an example of how I used this in a previous blog post:
For a free tool, you can’t go wrong.
And when starting a blog, being smart with your SEO is key to long-term, ongoing success without having to spend a ton of money upfront.
#9: Hubspot Blog Topic Generator
Do you struggle to come up with eye-catching titles for your blog posts? Me too, at least in the beginning.
Once you’ve been blogging for a while, you’ll start to see a pattern in the types of blog posts you write and the titles that match those.
But when you’re just getting started, you need all the help you can get.
Enter Hubspot’s blog topic generator tool. The tool works by asking you to enter in up to three nouns, words that relate to what you’re writing about.
You don’t have to enter three, but it helps to generate lots of ideas.
Here’s one I did based on the topic “dog walking”:
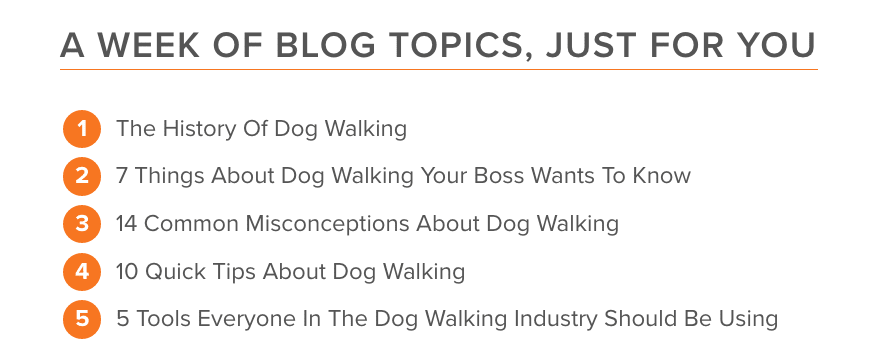 While not necessarily relevant to an article you might write about dog walking, it does give you ideas and next steps on where you could go with a blog post.
It’s definitely worth checking out and I use it when I’m struggling to come up with a blog post title.
#10: UpdraftPlus Backup
This plugin is one of the most important things you need to add to your blog when getting started. Without it, you could find yourself relying on your host for a backup…
And sometimes, they just aren’t reliable or consistent enough.
Imagine this…
You’ve been blogging for 6 months, posting 2-3 times a week and you’re so proud of the posts you’ve got.
You sit down at your desk, fire up your MacBook Air and wait for Chrome to load your WordPress site…
Only once it’s loaded, instead of seeing your beautiful blog, you see a massive 404 error page instead.
Uh-oh, something’s gone wrong. You quickly log into the backend of your WordPress site to find that a plugin you recently installed has deleted ALL your blog posts. Not a single one has survived.
You’re devastated for a minute… until you remember you’ve got UpdraftPlus Backup scheduled to backup your blog every day. Now all you have to do is go to your last backup, reinstall it and you’re good to go…
Compare this same scenario with NOT having the UpdraftPlus Backup installed. Imagine how you’d feel now… crap is one word to describe it, I’m sure you can think of others!
This plugin is free and there is a pro version as well. The free version is enough for daily backups and you can upgrade to the pro version at any time. This is really only needed if you’re planning to move your site to a new domain (like I did) or you need more robust procedures in place.
At the end of the day, starting a blog doesn’t have to cost you a lot of money. But it will cost you some money. How you spend that money will determine where you get the most bang for your buck.
This post should have given you insightful ideas about what tools and plugins you should be investing in upfront.
Questions? Comments? Share them below, particularly if you’re using any of these tools or are about to start a blog!
[optin_box style=”12″ alignment=”center” email_field=”email” email_default=”Enter your email address” integration_type=”convertkit” double_optin=”Y” thank_you_page=”https://hustleandgroove.com/thanksforsubscribing” list=”42312″ name_field=”name” name_default=”Enter your first name” name_required=”N” opm_packages=””][optin_box_field name=”headline”][/optin_box_field][optin_box_field name=”paragraph”]PHA+PGEgaHJlZj0iaHR0cDovL3d3dy5odXN0bGVhbmRncm9vdmUuY29tL3dwLWNvbnRlbnQvdXBsb2Fkcy8yMDE2LzA0L0pPSU4tVEhFLUhHLVNFQ1JFVC1WQVVMVC5qcGciPjxpbWcgY2xhc3M9ImFsaWduY2VudGVyIHNpemUtZnVsbCB3cC1pbWFnZS0zNDYzIiBzcmM9Imh0dHA6Ly93d3cuaHVzdGxlYW5kZ3Jvb3ZlLmNvbS93cC1jb250ZW50L3VwbG9hZHMvMjAxNi8wNC9KT0lOLVRIRS1IRy1TRUNSRVQtVkFVTFQuanBnIiBhbHQ9IkpvaW4gdGhlIEgmYW1wO0cgU2VjcmV0IFZhdWx0IHRvZGF5ISIgd2lkdGg9IjcwMCIgaGVpZ2h0PSIzMDAiLz48L2E+PC9wPgo=[/optin_box_field][optin_box_field name=”privacy”]We value your privacy and would never spam you — that’s just gross. You can unsubscribe at anytime.[/optin_box_field][optin_box_field name=”top_color”]undefined[/optin_box_field][optin_box_button type=”1″ text=”Access Now” text_size=”20″ text_color=”#ffffff” text_font=”Montserrat;google” text_bold=”Y” text_letter_spacing=”0″ text_shadow_panel=”Y” text_shadow_vertical=”1″ text_shadow_horizontal=”0″ text_shadow_color=”#0eb9cb” text_shadow_blur=”0″ styling_width=”20″ styling_height=”17″ styling_border_color=”#027381″ styling_border_size=”1″ styling_border_radius=”6″ styling_border_opacity=”100″ styling_shine=”Y” styling_gradient_start_color=”#0eb9cb” styling_gradient_end_color=”#027381″ drop_shadow_panel=”Y” drop_shadow_vertical=”1″ drop_shadow_horizontal=”0″ drop_shadow_blur=”1″ drop_shadow_spread=”0″ drop_shadow_color=”#027381″ drop_shadow_opacity=”50″ inset_shadow_panel=”Y” inset_shadow_vertical=”0″ inset_shadow_horizontal=”0″ inset_shadow_blur=”0″ inset_shadow_spread=”1″ inset_shadow_color=”#0eb9cb” inset_shadow_opacity=”50″ location=”optin_box_style_12″ button_below=”Y”]Access Now[/optin_box_button] [/optin_box]


12 replies to "Starting a Blog: How to Get the Most Bang for Your Buck"
Excellent post, Lise. Super thorough, with video how-tos, content upgrades and screen grabs! Love it.
I haven’t heard of pretty links or LSI keywords so will be checking these out.
Thanks so much for sharing, Lucy
Thanks Lucy, I’m glad you enjoyed it! Pretty Links is a lifesaver, particularly if you change the source url… You only have to update pretty links! LSI is phenomenal, great for keyword research and coming up with other phrases. Let me know if you need help with either ?
Wow! What an incredibly thorough post! First step for me will getting UpdraftPlus.
It’s worth it Katie! Backing up is so important ?
Very detailed post, I like the way you have included LSI words, it is easy to overlook the importance of SEO (it seems so overwhelming for starters)especially some simple things like LSI keyword research. I am still with Aweber, might consider Convertkit after reading your post.:-)
I agree re SEO Sireesha, it’s so important but can be confusing, which is why I love LSI keywords ?
Great list, thanks Lise!
You’re so welcome!
What an a-m-a-z-i-n-g post!!! I’ve been planning on starting a blog and I will definitely get these tools when I start it!!! Thank you so much Lise!
You’re so welcome Anamaria! Get that blog up and running now! Happy New Year 🙂
Great ideas! I’m going to go through all of them later today and see what I can incorporate into my blog.
Thanks!
Hi Stephanie, I’m glad you enjoyed them. Thanks for commenting and stopping by!